Before you can install Advance, you must configure your DNS and SSL settings to enable access to the Advance applications. Your goal is to:
In this Topic Hide
Before you begin this topic, you should:
See the Configuration Requirements Checklist for an itemized list of the things you must configure to get SSL and DNS working for Advance. The rest of the topic provides greater detail about configuration requirements.
There are two entities in Advance for which you need to configure DNS and SSL. These are:
| Name | Description | Example URL |
| Advance applications | The Advance applications,
installed under IIS.
The Advance applications require that TLS and DNS is configured for the AppDomain (see below). |
https://hdroot.yourorganization.com/
(root application)
https://yourorganization.com/HdaApi (API application) https://yourorganization.com/HdaAuth (authorization application) https://yourorganization.com/HdaUi (UI application) https://yourorganization.com/AssemblyService (core assembly service application) In the example URLs above, yourorganization.com is the appDomain. |
| Advance tenancies | The individual sites within Advance,
created by you using the root
application. Tenancies have their own sub-domain, named using
the tenancy moniker (see
below) that you specified during tenancy creation. You can create tenancies
after Advance
is installed.
Advance tenancies require that TLS and DNS is configured for their sub-domain. |
https://yourtenancy.yourorganization.com/
In the example URL above, yourtenancy is the tenancy moniker, and yourorganization.com is the appDomain. |
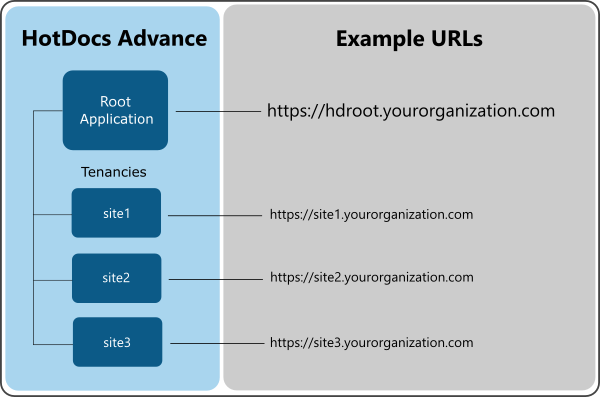
The URLs for the applications and tenancies have the following relationship:
You will need to set up SSL/TLS and DNS for these two entities as below.
Advance requires you to set up an https binding in IIS. To do this requires TLS certificates. You can use one of the following options:
A wildcard certificate secures all sub-domains under a specified domain, meaning that you only need a single certificate for multiple sub-domains.
When using a wildcard certificate, it is important to consider that they only secure the sub-domains at one level above the domain for which your certificate is configured.
Take the following example: imagine your wildcard certificate is configured to secure your domain at yourorganization.com. If you use this domain to point to the Advance root application, all Advance tenancies (e.g. site1.yourorganization.com) are secured by the certificate, as they are located at the sub-domain immediately above the domain secured by your certificate.
However, if you intend to use a sub-domain for Advance (for example, tenancy1.hotdocs.yourorganization.com), your existing wildcard certificate will secure the hotdocs sub-domain, but not the sub-domains for the tenancies (for example, site1.hotdocs.yourorganization.com), as they are a level higher than the sub-domain secured by the certificate. For this reason, you must be careful when setting up your DNS for Advance. Depending on how you configure DNS for Advance, it may be better to use a multi-domain certificate instead of a wildcard certificate.
If you have a multi-domain certificate – a certificate that provides a Subject Alternative Name field – you can associate additional DNS names with your certificate. This enables you to secure Advance and its tenancies when it is located under a sub-domain without having to create a new wildcard certificate. Whenever you add a new tenancy, you must add the sub-domain for the new tenancy to the subject alternative name field of your certificate.
If you decide to use individual certificates, there are some items that must be set up for each new tenancy you create. These are:
The AppDomain is the full domain under which Advance is installed. This should be the same as the host used for your https binding in IIS.
In most cases, the AppDomain will be the form:
{internal Active Directory domain}
For example, where your internal Active Directory domain is yourorganization.com, the AppDomain will be yourorganization.com.
The tenancy moniker is the unique name for the tenancy that you specify during tenancy creation. The moniker defines the sub-domain that is used as the URL for the tenancy. This has the format:
{moniker}.{appDomain}
For example, where your tenancy has the moniker tenancy1, and your AppDomain is yourorganization.com, the URL for the tenancy will be tenancy1.yourorganization.com.
You will need to know the moniker if you are creating individual TLS certificates and HTTPS bindings for each tenancy.
Generally, the Advance applications require the following DNS and SSL configuration:
Tenancies are individual sites under an Advance deployment, created by you through the root application UI. You use tenancies to organize and separate the data for different areas of an organization. These tenancies require their own SSL and DNS configuration. Generally, the requirements are:
The following checklist lists all the requirements you require to configure SSL and DNS for Advance.
| Name | Type | Description | |
| 1 | TLS certificate | TLS/SSL | Either a wildcard certificate, a multi-domain certificate, or individual certificates for your AppDomain and each tenancy. |
| 2 | Application pool access to TLS certificate | TLS/SSL | The account under which the HotDocs Advance application pool runs must be able to read the TLS certificate. |
| 3 | DNS record for Advance applications | DNS | You must route the AppDomain (i.e. the domain under which Advance runs) to the IP Address of the server on which Advance is deployed. |
| 4 | DNS record for tenancy | DNS | You must route the sub-domains for your tenancies to the IP Address of the server on which Advance is deployed. |
| 5 | HTTPS binding for Advance applications | IIS configuration | An HTTPS binding for your AppDomain. This must be created using your TLS certificate, added to the IIS site to which Advance will be deployed. |
| 6 | HTTPS binding for tenancy | IIS configuration | An HTTPS binding for your tenancies' sub-domains. This must be created using your TLS certificate, on the IIS site to which Advance will be deployed. |
Note: this section only applies if you are using individual TLS certificates for each of your tenancies. Each item below must be configured separately for each tenancy.
| Name | Type | Description | |
| 1 | TLS certificate | TLS/SSL | An individual certificate for your tenancy. |
| 2 | Application pool access to TLS certificate | TLS/SSL | The account under which the HotDocs Advance application pool runs must be able to read the TLS certificate. |
| 3 | DNS records | DNS | You must route the sub-domains for your tenancies to the IP Address of the server on which Advance is deployed. |
| 4 | HTTPS binding | IIS configuration | An HTTPS binding for your tenancies' sub-domains. This must be created using your TLS certificate, on the IIS site to which Advance will be deployed. |
| 5 | Require Server Name indication | IIS configuration | An IIS setting, configured when adding a new HTTPS binding to your site. You must select this option when adding bindings for each tenancy. |
In this example, we will use a wild card certificate to configure https on your appDomain, yourorganization.com. You should substitute this example value for your own appDomain where necessary.
The process for configuring DNS records will depend on the service you use to manage your DNS. However, you should meet the criteria specified in the Configuration for Advance Applications and Configuration for Advance tenancies sections above.
Assuming you know the IP address of your server, you can test that your changes to DNS routing were successful using the ping command.
Once you have finished the Advance installation process and created a tenancy, you can also perform this check to test routing to your tenancy sub-domain. For example, if you have a tenancy named tenancy1, you can use the command ping tenancy1.yourorganization.com.
In this example, we require a wild card certificate. The TLS certificate you use to configure your site bindings must allow requests to both the appDomain (i.e. yourorganization.com) and its sub-domains (i.e. *.yourorganization.com, which covers any tenancy you create in Advance). The account under which the HotDocs Advance application pool runs must have read access to the TLS certificate.
You are now ready to start installation of HotDocs Advance.
After you have finished configuring your environment, you can test it with the following steps:
To test that SSL is correctly configured in IIS, open the IIS root page in a web browser:
Your web browser opens and displays the IIS root landing page, loaded under HTTPS.
To test that DNS is correctly configured, run the following test using the Windows nslookup tool: