Lesson 13: Copy Components Between Component Files
Overview
As you automate a set of templates, you may notice there are some variables that are common between these templates. Rather than recreate each variable in every template, you can copy components from existing templates into the new template you are working on.
In the Employee Personal Data template, you need to insert a Multiple Choice variable for the employee’s state. Rather than create the variable, including typing all 50 states as options and their abbreviations as merge text, you will copy the component from an existing component file.
Start the Tutorial
If you are continuing immediately from Lesson 12, skip the instructions for opening the template and proceed to “Copy Components.”
If you closed the template at the end of Lesson 12, complete the following steps.
To open the tutorial template
- Open your word processor and click the
 HotDocs button, located on
your word processor’s toolbar. The My
Test Templates library appears.
HotDocs button, located on
your word processor’s toolbar. The My
Test Templates library appears.
If the My Test Templates library does not appear, choose Open Library (File menu), select the library in the default Libraries folder (for example, My Test Templates.hdl), and click Open.
- Select Employment Agreement and
click
 Edit.
The template appears, ready for you to edit.
Edit.
The template appears, ready for you to edit.
Copy Components
You can copy components from one component file into another. Copying components makes it easy to use the same variables, dialogs, example formats, and so forth in several templates. Once you have copied a variable from one component file into another, you can change its properties to fit that specific template.
When you copy a component such as a dialog or a Computation variable, all of the variables associated with the component are automatically copied as well.
To copy a Multiple Choice variable to the template
- At the template, click the
 Component Manager button. The Component Manager window appears.

- Click the
 Expand button in the upper-right corner of Component Manager. The window changes to show a second list of components.

- Click the Other component file drop-down button and choose states.cmp. The Components list changes to show the components contained in this file.
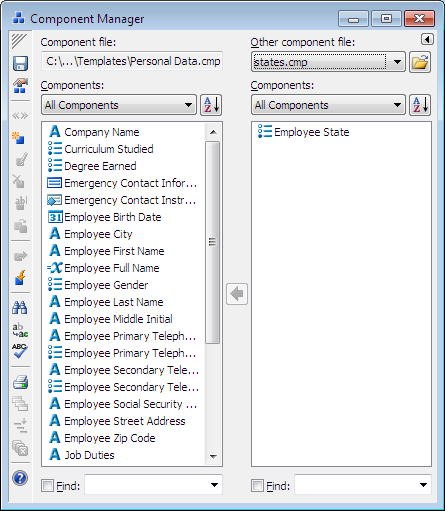
- Select Employee State and click the
 Copy Components button.
The variable is copied to the Personal Data component file, along with the associated merge text component, which contains a list of all the state abbreviations.
- Click the
 Collapse button to close the second component file.
You will leave Component Manager open.
Insert the Employee State Variable in the Template
You will now insert the variable into the template.
To insert the variable
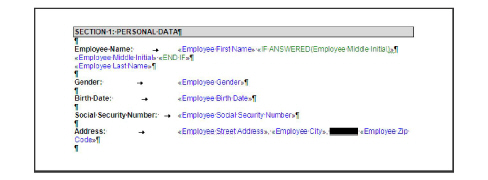
- In the PERSONAL DATA section of the template, select (highlight) the underscores between Employee City and Employee Zip Code. (In WordPerfect, highlight the blank space.)
- Click the
 Variable Field button. The Variable Field dialog box appears.
 - In the Variable type group, select Multiple Choice.
- Click the Variable drop-down button and choose Employee State.
Note the Option column and the Merge Text column already include the list of states along with their abbreviations.
- Clear Use default. (This will allow the merge text options to appear for just this instance of the variable only.)
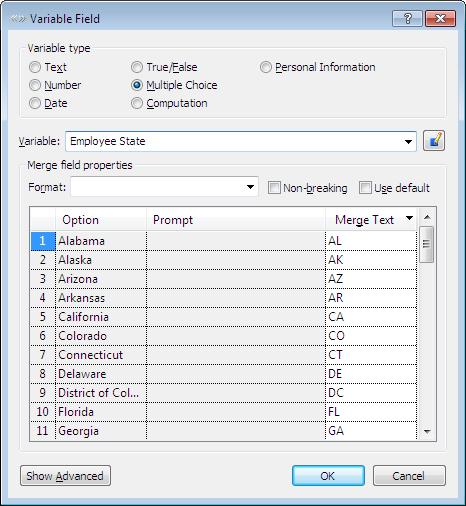
- Click Replace Once. The variable is inserted. (If you are using WordPerfect, click OK to close the Variable Field dialog box.)
Create the Personal Data Dialog
You can now group all of the variables associated with the employee’s personal information in a dialog.
To create a dialog
- Bring Component Manager to the front. (You can click its icon on the Windows task bar.)
- Click the
 New Component button. The New Component dialog box appears.
 - Select Dialog and click OK. The Dialog Editor appears.
- In the Dialog name box, enter the text Personal Data.
- Add the following variables to the dialog, in this order:
Employee First Name
Employee Middle Initial
Employee Last Name
Employee Gender
Employee Birth Date
Employee Social Security Number
Employee Street Address
Employee City
Employee State
Employee Zip Code
Employee Primary Telephone Number
Employee Primary Telephone Type
Employee Secondary Telephone Number
Employee Secondary Telephone Type
- When you are finished, click Save at the Dialog Editor.
- When you are finished, click OK at the Dialog Editor, and then close Component Manager.
Conclusion
If you do not want to go on to Lesson 14 at this time, click OK to close the Dialog Editor, and then close Component Manager and click the HotDocs ![]() Save and Close button to close the template. Finally, exit HotDocs.
Save and Close button to close the template. Finally, exit HotDocs.
If you are continuing on to Lesson 14, leave the Dialog Editor open.