Documents Tab
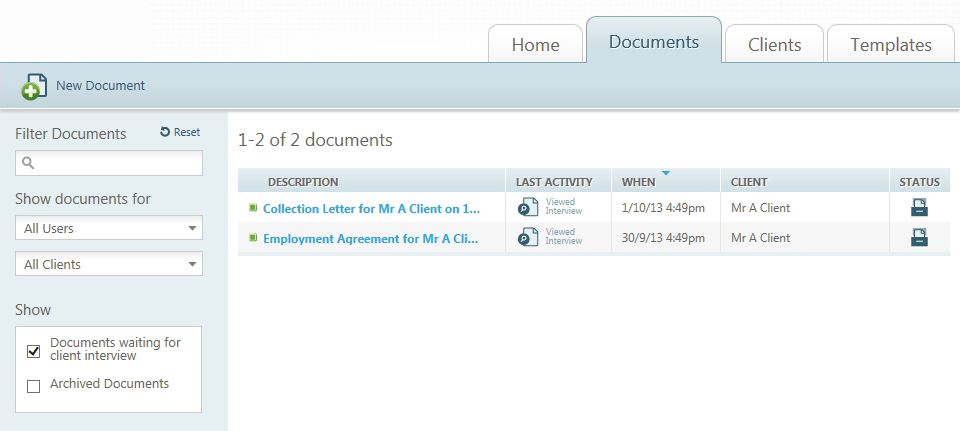
If you click the Documents tab, the main page appears and displays a list of the documents to which you have access permissions. Conceptually, documents are similar to work items, with the goal being final document generation. Use the Document tab as your hub for viewing and managing the active documents in your firm’s Document Services account.
HotDocs assembles the listed documents from interviews generated from the templates you or others of your firm's users upload to Document Services. When a user or a client completes an interview, HotDocs combines the data provided in that interview with the non-changing content in the template to create a final document.
Clients can create documents when you or other firm users Request Client Interviews, or provide a link to a template from your firm’s web page.
Documents Tab Main Taskbar
The taskbar for the main page of the Documents tab provides quick creation of a New Document for a given template, user, or client. You also have access to Answer Management.
Documents Tab Main Page Contents
The main page of the Documents tab provides a five column documents table that includes: Description; Last Activity performed on the document; When the activity took place; the Client to whom the document is attributed; and the current Status (Waiting for Client Interview, Open, and Closed).
Filtering Documents Panel
The Filter Documents panel enables items to be searched by keywords. When typing text into the filter box, the documents table is filtered automatically as the search criteria is entered.
- Show documents for - allows document filtering by user and client. The default settings are All Users and All Clients.
- Show - allows the user to choose whether or not to include Documents waiting for client interview and Archived Documents.
Creating a New Document
When you create a new document, you need to assign a client to the document, select a template on which to base the document, and choose a primary contact for that document. In addition, you may want to base the document on an existing document, adjust the default title, etc.

To create a new document:
- At the top of the page, click New Document; then, click Add a client to the document and select a client from the client list displayed on the right. Alternatively, click Add New Client at the top of the client list.
- Next, Select the Template field; then select an uploaded template from the right panel or perform a search by typing part of the template name in the Template field. If you have already created tags for your templates, then clicking the arrow on the right panel reveals a list of tags that you can use to assist with filtering template results. Click one or more tags to tailor your search as needed. Clicking on Reset at the top of the tag panel removes all tag filters applied.
- A default Title for the document is generated automatically from the selected template and client names however; this can be changed simply by editing within the Title field.
- To create a new document that has components pre-populated from an answer file or a previously created document, click Base this document on an answer file or previous document. You then either Upload an answer file or Select a previous document on which to base your new document.
- Primary Contact is set by default to the currently signed in user; however you can choose a different user by clicking the drop-down arrow.
- Click Finish to generate the new document. Once generated, the document appears on the Documents tab with a status of Open.
Managing Answer Files
Clicking Answer Management gives you the option to:
- Upload Answer File from your local computer or a network location.
- Link this document to a previously created or uploaded answer file. The answer file can be used to upload answers to another document, or with other HotDocs products. to pre-set interview answers when creating a document.
Documents Tab Edit Page
The Document Edit page can be accessed by selecting the document title anywhere a document is listed.
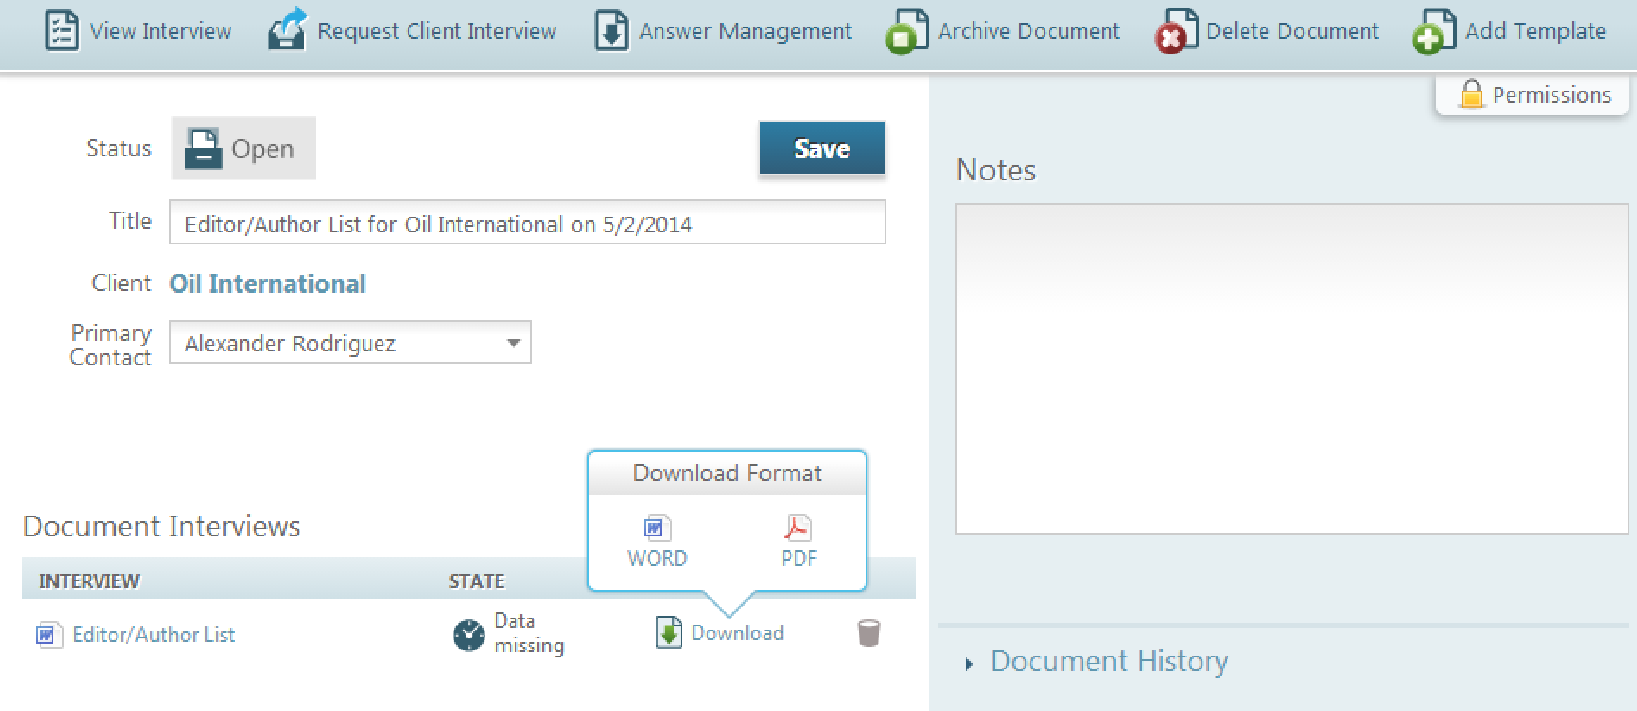
The Document Edit page provides several means to edit the data associated with a document. You can:
- Edit the Title field to change the document’s title
- Assign a different user as document owner by selecting a different user from the Primary Contact drop-down list
- Make any notes you want about the document in the Notes text box at the top right of the page
- Save any changes you make to the Title, Primary Contact, or Notes information
- Edit the client’s information by clicking the Client name
- View a document’s history by clicking the Document History arrow below the Notes text box
The Document History details all the ACTIVITY associated with a document, including WHEN the activity occurred and the USER who performed it.
The Document Interviews table in the lower left quadrant of the page displays a list of all interviews a user produces for a document.

From this table, you can:
- Open an interview by clicking the interview (in the INTERVIEW column)
- View the STATE of each interview (for example, is it Complete, or is there still Data missing?)
- In the OUTPUT column, Download the assembled document (once you complete or partially complete an interview for a document, the Download option enables, permitting you to download the document either in a Word or PDF format)
When converting an RTF or DOCX document to PDF, HotDocs uses a built-in PDF converter, which analyzes the codes contained in the word processor file and translates them to PDF. This differs from the method used by other thirdparty PDF converters, which rely on an instance of Microsoft Word on the server from which the document is "printed" using a driver to create the PDF document. PDF documents created using a PDF driver can typically handle a greater number of formatting variations, while the PDF conversion method used by HotDocs Cloud Services works best for documents with simpler formatting. Because HotDocs uses Cloud Services' built-in PDF conversion, some formatting differences may exist between the original word processor document and the PDF.
While the default behavior of the Download feature is to provide the option to download the assembled document in the user’s native MS Word format, you can restrict the download format to PDF by selecting Force PDF Download for this template on the Template Tab Details Page.
- Delete an interview by clicking the trash can icon
Documents Edit Page Taskbar
The taskbar for editing a document whose interview has not yet been completed provides quick access to the following buttons: View Interview, Request Client Interview, Answer Management, Archive Document, Delete Document, and Add Template. For a document whose interview has been completed, the list excludes Request Client Interview.
View Interview
In order to populate the document with data, the interview questions must be answered. To open the interview to input the relevant document information, click View Interview in the taskbar. This opens the Interview. You can then step through the questions in the Interview Outline, answering all that are applicable. When finished, click Submit, or click Cancel to return to the Documents tab.
Request Client Interview
If the Request Client Interview feature is enabled for your company and you have previously selected a client for the document, you are then able to “request a client interview,” which causes Document Services to generate an email to your client requesting the client complete an interview.
To generate a Document Services email to the client requesting the client complete an interview:
- Click Request Client Interview. The client interview request input appears in the right hand panel. You can edit the client details and the email before it is sent.
- If you want, under Choose Recipient, click to select a recipient in the list of previous recipients, otherwise click Add New Recipient.
- If you want, enable the client to download the finished document by selecting Allow client to download finished interview.
- Once you are happy with the details and the email content, click Send (at the top).
Answer Management
This option is also available on the main page of the Documents tab .
Archive Document
When an interview is finished, either by a firm user or through a client interview, the document can be marked as complete by clicking Archive Document. This closes the document for editing and changes the status of the document to Closed.
If a document has the status of Open, the answers can be edited in the interview. If a document is archived, the document must be re-opened in order to edit any answer in an interview. This can be achieved by clicking Reopen Document in the taskbar. This button becomes available once a document is archived.
Delete Document
A document can be deleted by clicking Delete Document in the taskbar. This permanently removes the document from your firm’s Document Services site.
Add Template
You can add a template to Document Services by clicking Add Template in the taskbar. Once the new template is added to the template list for this document you are able to assemble the document directly from the interview.
To add a template to your document:
- From the taskbar, click Add Template.
- If the list of available templates is long, in the Filter Templates box, begin typing the title or part of the description.
You can also click the arrow to the left of the template list to expose the tag list panel where you can click to select a tag; otherwise, select a template directly from the template list.
The template appears under Document Interviews. Repeat for as many templates as you want to add. - Click Save.
If you want, click View Interview to check the interview flow you have created by adding templates.