At a Glance: The Answer File dialog box
A
B
C
D
Illustrations used throughout the help file depict HotDocs Developer and may include features not present in HotDocs Player .
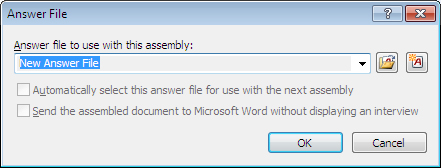
When you click to assemble a template you will usually see the Answer File dialog box appear. Unless you have set a default answer file (see Create a Default Answer File) then the Answer File field A will show the option New Answer File and when you click OK it will start a blank answer file which you can choose to save during assembly or after assembling the template.
Clicking on the Answer File field A will allow you to choose from a drop-down list of recently used answer files.
If you would like to use a previously saved answer file click on the  Open Answer File button B where you will be taken to Answer File Manager to choose the file you would like to use for this assembly.
Once you have chosen an answer file the two check boxes D ungray. The top check box allows you to have HotDocs automatically select this answer file the next time you assemble this template. The bottom check box allows you to send the assembled document to Microsoft Word without displaying the interview. This is useful if you have a completed answer file that you don't wish to edit as HotDocs will immediately create the document.
If after selecting an existing answer file you decide you would instead like to use a new answer file then clicking the  New Answer File button C will return the Answer File field to displaying New Answer File.
To find out more about selecting an answer file follow the link below: