Lesson 2: Link Variables to Fields in a Database Table
Overview
As you already know, to create an interview, HotDocs reads through the template and displays the variables (or dialogs, if the variables are linked to the dialogs) in the order it reads them. When variables are linked to a database table (rather than a dialog), HotDocs displays the database table in the interview so you can choose a record. The selected data is then retrieved from the database file and merged into the assembled document.
In this lesson, you will link variables in the template to fields in both the CLIENT and INVOICE tables. You will also designate key fields in each table. Key fields help HotDocs remember which records have been selected during an interview.
Start the Tutorial
If you are continuing immediately from Lesson 1, skip the instructions for opening the template and proceed to “Link Variables to Fields.”
If you closed the template at the end of Lesson 1, complete the following steps.
To open the Collection Letter template
- Open your word processor and click the
 HotDocs button. The My
Test Templates library appears.
HotDocs button. The My
Test Templates library appears.
If the My Test Templates library does not appear, choose Open Library (File menu), select the library in the default Libraries folder (for example, My Test Templates.hdl), and click Open.
- Select Collection Letter and
click
 Edit.
The template appears, ready for you to edit.
Edit.
The template appears, ready for you to edit. - Click the
 Component
Manager button. The Component
Manager window appears.
Component
Manager button. The Component
Manager window appears.
Link Variables to Fields
Once the connection to your database has been defined, you can link fields in the database table to variables in your template. These links allow HotDocs to retrieve information from the database table each time the template is used to assemble a document.
When linking variables to fields, data types must match. For example, if the field type is text, you must link to either a Text variable or a Multiple Choice variable (since Multiple Choice variables are text values).
To link variables in the template to fields in the database
- With Component Manager displayed, select Client Data from the list of components and click the
 Edit Components button. The Database Editor appears.
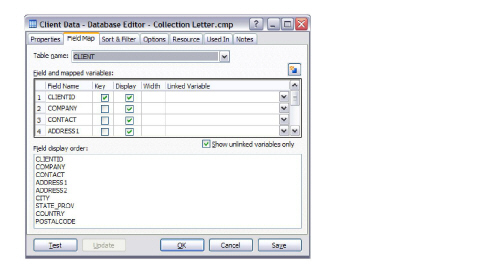
 - Click the Field Map tab. The CLIENT table appears, with a list of all the fields in the table.
- In the Linked Variable column, click the drop-down button that corresponds to the COMPANY field and select Company Name.
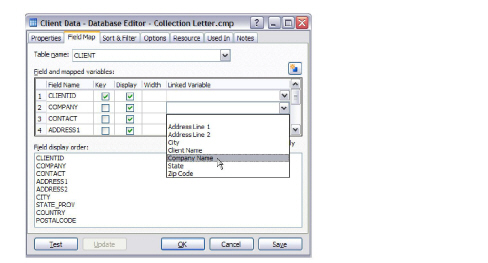
The HotDocs variable Company Name is now linked to the COMPANY field in the CLIENT database table.
By default, once you link a variable to a field, HotDocs removes the variable from the list. You can view the entire list of variables—linked and unlinked—by clearing Show unlinked variables only. When you do this, variables that are already linked are surrounded by brackets and are sorted to the bottom of the variable list.
- Repeat step 3 to link the following variables to fields in the database table:
Field Variable CONTACT
Client Name ADDRESS1 Address Line 1 ADDRESS2 Address Line 2 CITY City STATE State POSTALCODE Zip Code
The fields in the database table are now linked to variables in the template. Now that you have done this, you must make sure one of the fields is designated as the key field.
Designate a Specific Field as the Key Field
During the interview, when HotDocs connects to a database, it displays a table of records. When you select a record and move to another dialog, HotDocs can remember from where in the database table the record was selected so that if you later review the table, your record will still appear selected.
For HotDocs to operate this way, you must make one of the fields in the database component the key field. A key field contains information that is unique to a record—for example, an invoice number or a customer identification number. Without a key field, HotDocs has no way to remember from where in the table the record was retrieved and, therefore, cannot retain this information once you navigate to a new dialog. This may be confusing to some users since even though answers may appear in the assembled document, the table in the interview shows that no record has been selected.
Selecting a key field also makes it easier to reuse an answer file that contains selected database records, for the reasons explained above.
If you are connecting to a database table using a native OLE DB provider, HotDocs recognizes the key field that was designated when the database table was first created and automatically assigns it as the key field for the database component. Even so, it is always a good idea to make sure the correct key field is specified.
HotDocs does not recognize existing key fields when you connect to the database using the OLE DB provider for ODBC, or when your database component is connected to a database view. You must manually identify the key using the Database Editor.
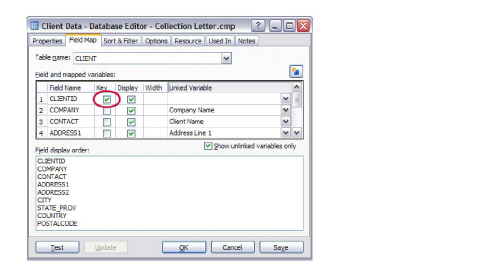
Because a client’s identification number will always be unique, you must make sure the CLIENTID field is designated as the key field.
To ensure CLIENTID is designated as the key field
- In the Key column, make sure the box next to the CLIENTID field is selected.
Now that you have linked fields in the CLIENT table to corresponding variables in the template, you can test how the database component will appear during assembly.
Test the Database
Just as you can test variables and dialogs as you create them, you can test database components.
To test the database component
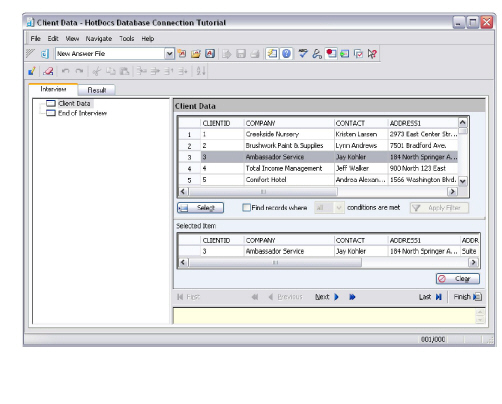
- At the Database Editor, click Test. A test assembly window appears, displaying the Client Data table.
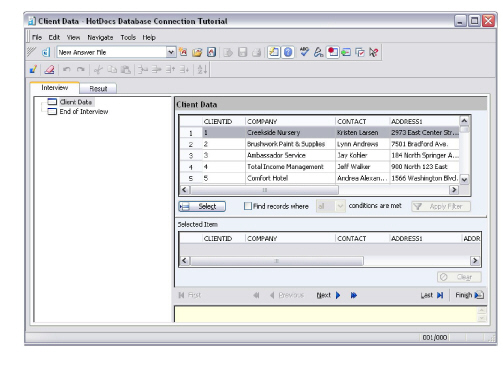
- Click a record in the table and click
 Select, located below the database spreadsheet. HotDocs adds the record to the Selected Item list, at the bottom of the dialog pane.
If you click the Show command string link, HotDocs displays the database command string it used to retrieve this data.
- Click the Result tab. The window changes to show the information the database component retrieved.
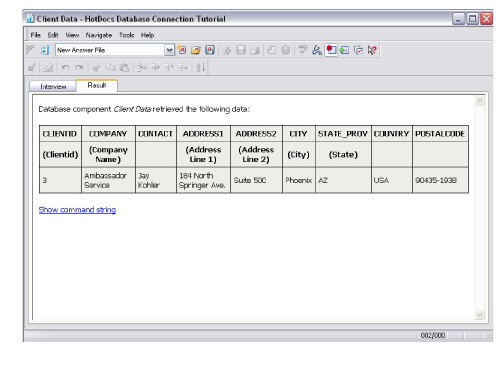
The first row in the table shows the names of the fields in the actual database table, while the second row shows the names of the HotDocs variables to which these fields are linked. The third row shows the particular answers that were retrieved from the database table.
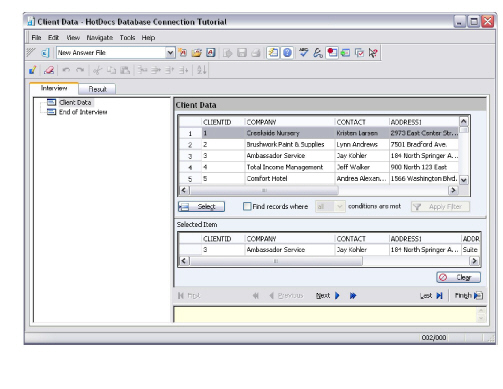
- Click the Interview tab again. Notice that the record is still listed in the Selected Items list. This is because the database component has a key field. If no key field had been assigned, no records would appear selected.
- Close the test assembly window by choosing Close from the File menu. HotDocs asks you to save your answers.
- Decide whether to save your answers, based on the following information:
For more information on using test answer files, see the HotDocs Help.
- If you click Save or Save As, you will be prompted to specify an answer file name and title. Type Test Answer File in the File name box and accept the suggested Title. From this point on, this answer file will be used each time you test a component or test assemble the template, and you will no longer be prompted to save your answers after each test. (You can, of course. choose a different answer file when you are at the assembly window.)
- If you click Don’t Save, each time you test a component or test assemble the template, you will use an empty, untitled answer file. You will also be prompted to save your answers each time you finish a test.
- Click OK at the Database Editor.
On Your Own
Open the Invoice Data database component, click the Field Map tab, and link the following variables to their corresponding fields in the INVOICE table. Follow the instructions given in Link Variables to Fields.
| Field | Variable |
| INV_NUMBER | Invoice Number |
| INV_DATE | Invoice Date |
| INV_TOTAL | Invoice Total |
After linking the variables, make sure INV_NUMBER is designated as the key field. (Follow the instructions given in Designate a Specific Field as the Key Field.) Then, when you are finished, click OK to close the Database Editor.
Conclusion
You are now finished with this lesson. In it, you learned how to map variables in the template to fields in a database table. You also learned how to assign key fields, which helps HotDocs remember which record was selected.
If you do not want to go on to Lesson 3 at this time, close Component Manager (by clicking the X in the upper-right corner of the Component Manager window), and then click the ![]() Save and Close button to close the template. Then exit HotDocs.
Save and Close button to close the template. Then exit HotDocs.
If you are continuing on to Lesson 3, click the ![]() Save button to save your work.
Save button to save your work.