Lesson 3: Create a New Template
Overview
When you create a template, you must specify what text will be used in the template. For example, you can either use text from an existing document as the basis for the template, or you can create a new, empty template and just add the text as you automate it. For this lesson, you will use text from an existing employment agreement. When the template is created, special HotDocs toolbars are added to the word processor window. Automating a template in the word processor lets you use all of the functionality of the word processor, while also providing full HotDocs functionality through these custom HotDocs toolbars. Once you have created a template, you can use HotDocs template-building features to automate the template. The next several lessons teach you how to create and automate an Employment Agreement template like the one you assembled in Lesson 1.
Start the Tutorial
If you are continuing immediately from Lesson 2, skip the instructions for starting HotDocs and proceed to “Create the Template.” If you closed HotDocs at the end of Lesson 2, complete the following steps.
To start HotDocs
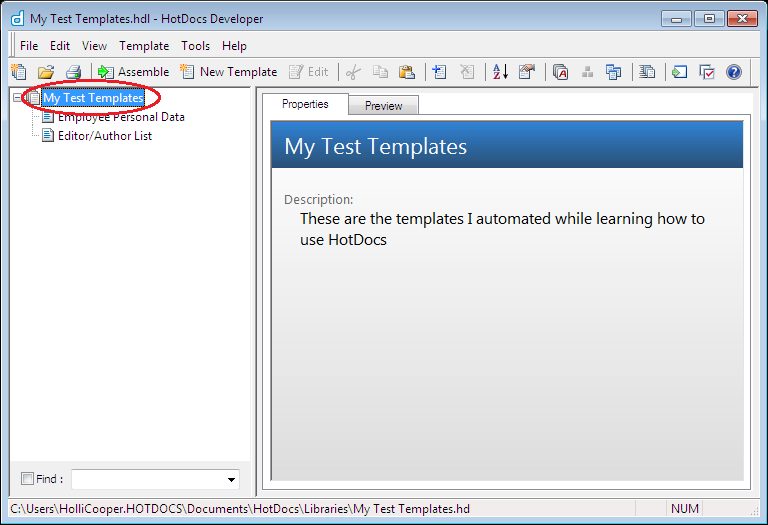
- Choose Start > Programs > HotDocs 11 > HotDocsDeveloper. The Test Templates library appears.
If the My Test Templates library does not appear, choose Open Library (File menu), select the library in the default Libraries folder (for example, My Test Templates.hdl), and click Open.
Create the Template
You will now create the Employment Agreement template. You will use an existing document as the basis for the template.
To create a template
Template titles and descriptions help the user identify the template at the HotDocs library.
If you performed a custom installation, the document will be located in the default Documents folder you specified during installation. Use your computer’s Find command (Start > Search > For Files or Folders) if you are having a difficult time finding the file.
The text in this document will be used as the text for the template you are creating.
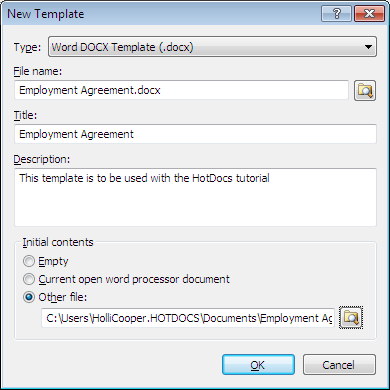
The document’s folder path and file name appear in the Other file box.
- In the My Test Templates library, click on the My Test Templates folder.
- Click
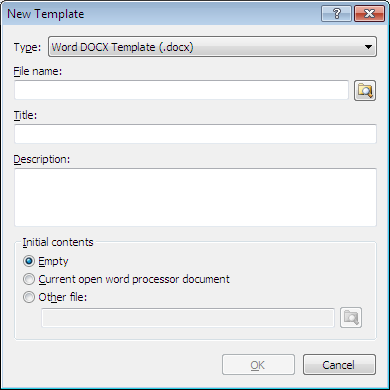
 New Template. The New Template dialog box appears.
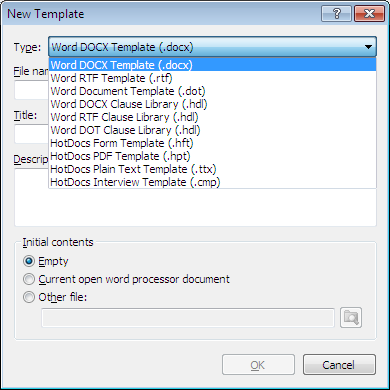
 - Select the type of template you want to create from the Type drop-down list. Base your selection on which word processor you have installed. For example, to create a Microsoft Word template, select Word DOCX Template.
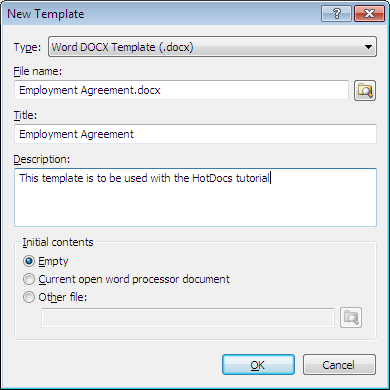
- Type Employment Agreement in the File name box.
- Click in the Title box and accept the suggested title, Employment Agreement.
- Type This template is to be used with the HotDocs tutorial in the Description box.
- In the Initial contents group, select Other file and click the
 Browse button. The New Template Initial Contents dialog box appears.
 - Select either Employment Agreement.doc (Word users) or Employment Agreement.wpd (WordPerfect users), located in the default word processor Documents folder.
- Click OK to return to the New Template dialog box.
- Click OK. The new template file is created and opened in the word processor. The template is also added to the template library.
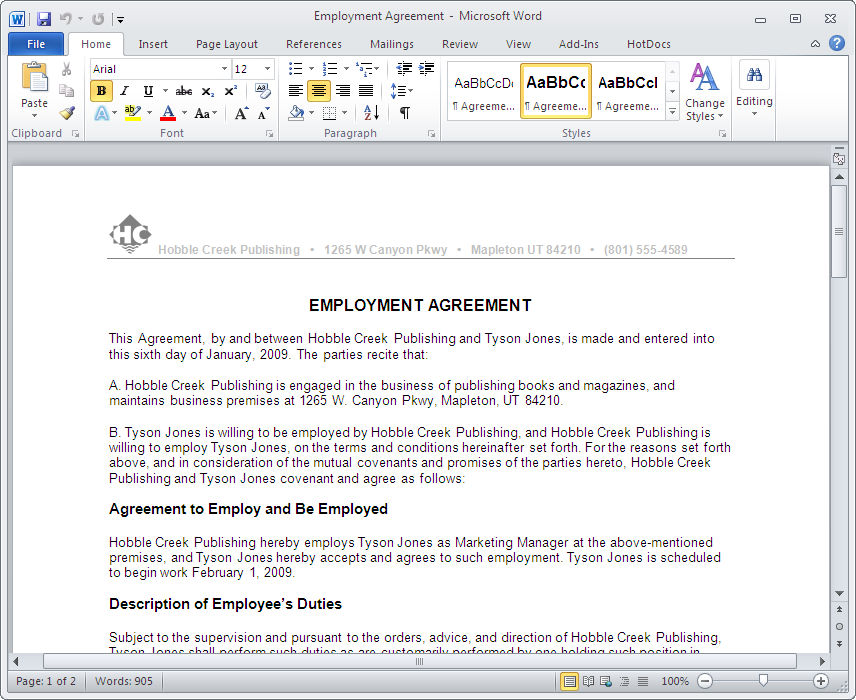
When you create a template, HotDocs automatically creates a companion file for the template called a component file. This component file is necessary for a template to work, since it stores all of the information about the template’s automation (such as component names, template properties, and so forth).
The component file works automatically in the background—as you create variables and other components in the template, they are automatically stored in the component file.
HotDocs gives the component file the same name as the template file. In this instance, HotDocs has created a component file named Employment Agreement.cmp (since your template file is named Employment Agreement.docx or Employment Agreement.wpt).
Components are elements in a HotDocs template that display or store information about the answers that are merged. Examples of components include variables, dialogs, dialog elements, merge text groups, and formats.
Familiarize Yourself with the HotDocs Toolbar
At any time during these lessons, you can click the ![]() HotDocs Help button to display the HotDocs Help file. You can then search for more information about anything in the tutorial you don’t understand or about which you would like to learn more.
HotDocs Help button to display the HotDocs Help file. You can then search for more information about anything in the tutorial you don’t understand or about which you would like to learn more.
When you create a new template, HotDocs adds custom toolbars to the template. These toolbars appear below the word processor toolbars. You use these toolbars to edit the HotDocs template. (The appearance and location of the buttons vary slightly, depending on the word processor you are using.)
In Word 2007, 2010 and 2013, all HotDocs editing and navigation buttons can be found on the HotDocs tab of the Word ribbon.
The buttons are:
![]() Save
Save
![]() Save and Close
Save and Close
![]() Test Assemble
Test Assemble
![]() Variable Field
Variable Field
![]() IF Field
IF Field
![]() REPEAT Field
REPEAT Field
![]() INSERT Field
INSERT Field
![]() ASK Field
ASK Field
![]() Other Fields
Other Fields
![]() Edit Component
Edit Component
![]() Component Manager
Component Manager
![]() Create Model
Create Model
![]() Clause Library
Clause Library
![]() HotDocs Help
HotDocs Help
![]() Apply Colors
Apply Colors
![]() Label Fields
Label Fields
![]() Match Fields
Match Fields
![]() Go to Field
Go to Field
![]() Previous Field
Previous Field
![]() Next Field
Next Field
In addition to these buttons, you can use the ![]() HotDocs button to display the HotDocs library. Click on the arrow below it to display a list of further options.
HotDocs button to display the HotDocs library. Click on the arrow below it to display a list of further options.
You should always use the ![]() Save button to save your work, or the
Save button to save your work, or the ![]() Save and Close button to save and close a template, rather than your word processor’s Save and Close commands. Using these buttons ensures the template and component file are both properly saved and closed.
Save and Close button to save and close a template, rather than your word processor’s Save and Close commands. Using these buttons ensures the template and component file are both properly saved and closed.
Conclusion
You are now finished with this lesson. In it, you learned how to create a text template and add it to the template library. Additionally, you learned about the buttons on the HotDocs toolbar.
If you do not want to go on to Lesson 4 at this time, click the HotDocs ![]() Save and Close button to close the template. Then exit HotDocs.
Save and Close button to close the template. Then exit HotDocs.