Lesson 3: Create Answer Fields
Overview
The underlying text of a form template is static, meaning the text and graphics cannot be changed, and nothing can be entered or changed on the form. In order to enter information on the form, you must create fields that overlay the template. These fields are dynamic and information (answers) entered in them can be modified as needed.
In this lesson, you will learn how to create answer fields. In subsequent lessons, you will learn how to create variables and attach them to these fields.
Since fields don’t have names, the tutorial refers to fields by the label of the corresponding blank on the form. For example, the field in the Name blank will be called the Name field.
Start the Tutorial
If you are continuing immediately from Lesson 2, skip the instructions for opening the template and proceed to “Create Simple Text Fields.”
If you closed the template at the end of Lesson 2, complete the following steps.
To open the tutorial template
- Open HotDocs Developer (choose Start
> Programs > HotDocs 11 > HotDocs Developer).
The My Test Templates library
appears.
If the My Test Templates library does not appear, choose Open Library (File menu), select the library in the default Libraries folder (for example, My Test Templates.hdl), and click Open.
- Select Life Insurance Application and
click
 Edit.
The template appears in HotDocs Automator, ready for you to edit.
Edit.
The template appears in HotDocs Automator, ready for you to edit.
Create Simple Text Fields
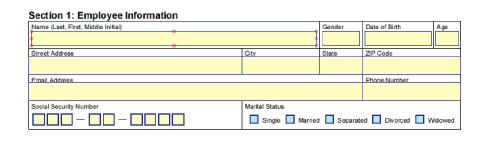
The first place where information needs to be added to the form is the Name blank.
To create an answer field in the Name blank
- Make sure the
 Select Tool button is selected in the HotDocs Automator toolbar, and then place the cursor directly below the word Name.
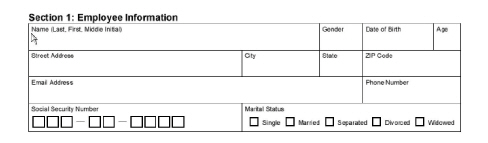
- Press and hold down the left mouse button and move the cursor to the lower-right corner of the blank. Field borders will appear as you drag the cursor.
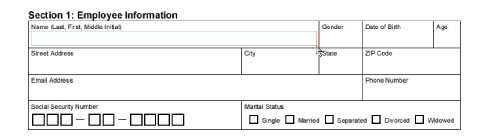
- Release the mouse button. The new field is created and the field is automatically selected, as indicated by the handles on the field borders.
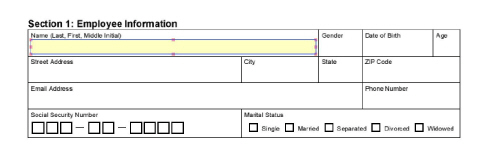
You can use the Page Up/Page Down keys or the Home/End keys to adjust the height and width of a field, respectively. To move a field up, down, left, or right, use the arrow keys on your keyboard.
If you want to adjust the size of the field, click one of the handles and drag. (Or, to move the whole field, click inside the field and drag.)
On Your Own
The second blank that needs a field is the Gender blank. Create a field in this blank. Refer to the instructions in the previous section if you need help doing this.
Auto-Detect Fields
You can create a field by manually drawing the field with your mouse cursor (like you did for the Name and Gender blanks), or you can have HotDocs create a field by automatically detecting the borders surrounding the blank. You will use this method to place a field in the Date of Birth blank.
To auto-detect a field for the Date of Birth blank
With existing fields, you can select a field and click the ![]() Detect Field button to resize it. This can make the field fit more tightly in its allotted space.
Detect Field button to resize it. This can make the field fit more tightly in its allotted space.
- Click in the Date of Birth blank, and then click the
 Detect Field button. (Or, double-click in the Date of Birth blank.) HotDocs creates a field in the blank.
On Your Own
Create fields for the following blanks in the Employee Information section (following the instructions you used to create the Date of Birth field, above):
Age
Street Address
City
State
ZIP Code
Email Address
Phone Number
Create Single-Character Fields
Many forms contain boxes where users must enter a single character in each box. For example, on the form you are automating, the Social Security Number blank contains nine boxes—one for each digit in the employee’s Social Security number. You can create answer fields in these boxes and format them to allow users to enter a single character in each box.
To create single-character fields
- Double-click in the first box in the Social Security Number blank. HotDocs creates a new field that fills the box.
The Field Properties dialog box can be left open at all times. The properties displayed in it will change depending on which field(s) is selected. Throughout this tutorial, if the Field Properties dialog box is already visible, you do not need to click the
 Field Properties button again to display it.
 - Click the
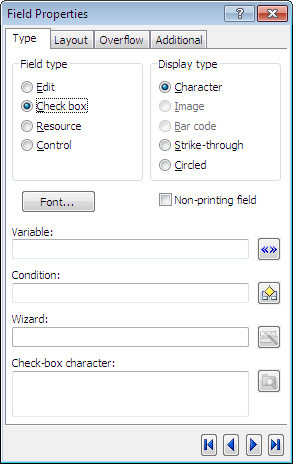
 Field Properties button. The Field Properties dialog box appears.
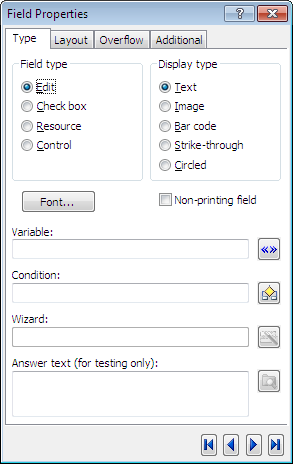
For the most part, the properties you specify at the Field Properties dialog box control how answers entered during assembly are processed and displayed in the assembled form document.
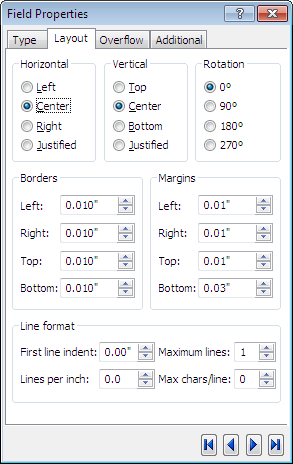
- Click the Layout tab. The view changes to show layout options of the selected field.
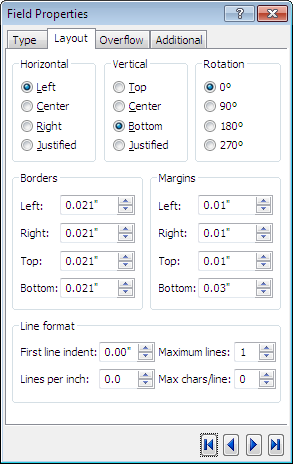
- Change the Max chars/line setting to 1.

- Repeat steps 1–4 for each of the remaining boxes in the Social Security Number blank.
Create Check Box Fields
Check box fields are similar to single-character fields, but rather than allowing a user to type in the field, HotDocs simply inserts a check box character (typically an X) when the user clicks the box. This form uses five check boxes to specify the employee’s marital status, and another check box to indicate the employee’s authorization to have life insurance contributions deducted from his or her wages.
To create check-box fields
- Double-click in the first Marital Status box. HotDocs creates a new check box field that fills the box.

- Repeat step 1 for the remaining check boxes in the Marital Status blank, as well as the check box in the Authorization and Signature section at the end of the second page.
The color of the check box fields is different than that of other fields you have created so far. When HotDocs creates a new field, it automatically creates a check box field if the size is less than the check-box detection threshold. (You can change this threshold, which is 0.19” by default, in HotDocs Options > Form Documents > Properties for New Fields.)
Change Properties for Multiple Fields
Sometimes, you may need to change field properties for multiple fields. For example, when you created fields for the Social Security Number blank, you set the maximum characters per line for each field. If you want multiple fields to have the same value for a particular field property, you can set this property for all of those fields at once.
You can specify the horizontal and vertical position of answers in a field. Depending on the height of the field when you first create it, HotDocs may default the vertical alignment to Top or Bottom. To give your form a more uniform appearance, you may wish to make them all one or the other. For most of the fields in the Employee Information section, you can make the answers all bottom-aligned. For the Social Security Number blanks, the numbers will look better if they are centered both vertically and horizontally in the fields. You can set these layout options for multiple fields at the same time.
To change properties of the Employee Information fields
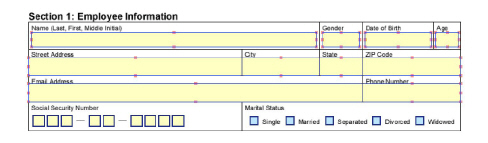
- Click the Employee Name field. Handles appear on the field borders, indicating that the field is selected.
- Press and hold the Shift key while clicking on each of the fields in the first three rows of the Employee Information section. (Do not select the Social Security Number and Marital Status fields.) All 10 fields are selected.
- If the Field Properties dialog box is not visible, click the
 Field Properties button. The Field Properties [Multiple] dialog box appears.
If the fields did not all begin with the same alignment, you may see multiple options selected in the Horizontal or Vertical group.
- At the Layout tab, select Left from the Horizontal group box and Bottom from the Vertical group box. Those properties are set for all 10 fields at once.

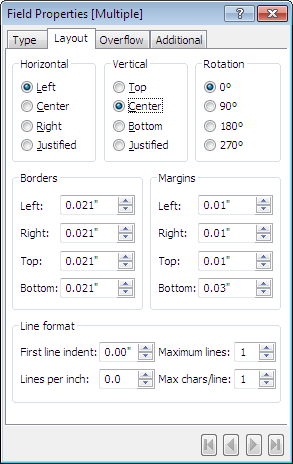
- Click the first Social Security Number field. Handles appear on the field borders, indicating that the field is selected.

- Press and hold the Shift key while clicking on each of the remaining fields in the Social Security Number blank. All nine fields are selected.

- At the Layout tab of the Field Properties [Multiple] dialog box, select Center from both the Horizontal and Vertical group boxes. Those properties are set for all nine fields at once.
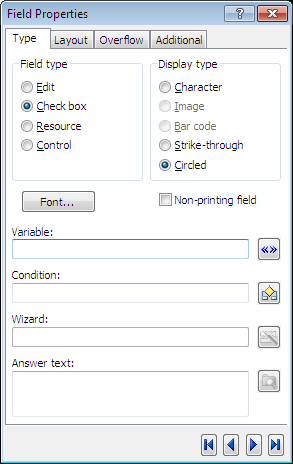
Create Circled Fields
The Medical History section of this form contains five questions where the user must circle Yes or No. You can create special check box fields that circle text on your form, rath er than inserting the default check-box character.
To create circled fields
- In the Medical History section, create a field that covers the Yes response in the first question. (You must manually “draw” this field like you did for the Name field above because auto-detection cannot create fields that overlap static text on the form.)

- Click the
 Field Properties button. The Field Properties dialog box appears.
- At the Type tab, select Check box from the Field type group. The field color changes to indicate it is now a check box. (Circled fields are actually a special kind of check box.)
- Select Circled from the Display type group. The field changes to show only the outer border, which indicates that it is a circled field.
- Repeat steps 1–4 to create a field for the corresponding No response.
- When you are finished creating the fields, close the Field Properties dialog box.
You must also create circled fields for the remaining questions in the Medical History section. You can do this in the same way as you created the first two circled fields, or you can copy and paste those two fields to save time.
To copy and paste the circled fields
If you want all of your circled fields to be the same size, you can select all of the fields (press and hold the Shift key while clicking each field) and then click the ![]() Align Fields button.
Align Fields button.
- Press and hold the Shift key while clicking on the Yes and No fields you created for the first question.

- Select Copy from the Edit menu (or press Ctrl+C). The fields are copied.
- Click on the form where you want the lower left corner of the copied fields to appear. (Click below and to the left of the word Yes in the second question.)

- Select Paste from the Edit menu (or press Ctrl+V). The copied fields are pasted at the specified location. (If they are not exactly where you would like them to appear, use the arrow keys on your keyboard to move the fields to the correct location.)

- Repeat steps 3–4 for the remaining questions in the Medical History section.
On Your Own
You can now create fields for the rest of the blanks in the template:
- In the Coverage Information section, create fields for the Amount of Coverage and Monthly Contribution to Cash Account blanks.
Automatically detecting the fields in the Coverage Information section will not work because the dollar signs ($) in each blank keep HotDocs from detecting the underlying field borders properly. Instead, you must manually create the fields.
- In the Medical History section, create five fields where the user can type an explanation for any responses marked yes. These fields should be tall enough to accommodate multiple lines of text.
- In the Beneficiary Designation section, create fields in each cell of the table on the first page, as well as its continuation at the top of the second page.
- In the Other Remarks section, create a field on each line. You will group these fields together in a subsequent lesson to make them behave like a single, multiple-line field.
- In the Authorization and Signature section, create a field in the Date Signed blank. Do not create a field for the employee’s signature, however.
Conclusion
You are now finished with this lesson. In it, you learned how to create various types of answer fields. With these fields in place, you could use this template to assemble a document using direct-fill assembly at the Form Document tab. However, because the fields do not have variables attached to them, answers you enter could not be saved in an answer file. You will address this limitation in the next lessons as you learn how to attach variables to the answer fields in your template.
Click the ![]() Save Form button to save the template. If you do not want to go on to Lesson 4 at this time, choose Exit (File menu). Then exit HotDocs.
Save Form button to save the template. If you do not want to go on to Lesson 4 at this time, choose Exit (File menu). Then exit HotDocs.