Lesson 9: Create Answer-Gathering Dialogs
Overview
In this lesson, you will learn how to group the variables in your template into dialogs. You will also learn how to change variable prompts and add additional explanatory text (dialog elements) to your dialogs.
After creating dialogs, you will then learn how to display those dialogs in answer wizards, which help users enter answers during direct-fill assembly. You will test these answer wizards as you assemble the template using direct-fill at the end of the lesson.
In lesson 10, you will then learn how to add an interview and complete your form template.
Start the Tutorial
If you are continuing immediately from Lesson 8, skip the instructions for opening the template and proceed to “Gather Variables into Dialogs.”
If you closed the template at the end of Lesson 8, complete the following steps.
To open the tutorial template
- Open HotDocs Developer (choose Start
> Programs > HotDocs 11 > HotDocs Developer).
The My Test Templates library
appears.
If the My Test Templates library does not appear, choose Open Library (File menu), select the library in the default Libraries folder (for example, My Test Templates.hdl), and click Open.
- Select Life Insurance Application and
click
 Edit.
The template appears in HotDocs Automator, ready for you to edit.
Edit.
The template appears in HotDocs Automator, ready for you to edit.
Gather Variables into Dialogs
How you divide variables into dialogs depends on the template and your own preferences. Generally, you begin with the most basic information, which, in this template, is the employee’s personal information. In templates that contain logical sections, such as the life insurance application you are automating, it also makes sense to group variables as they are grouped on the form itself. In this template, you will create a dialog for each section of the form, beginning with the Employee Information section.
To create the Employee Information dialog
- At the template, click the
 Component Manager button. The Component Manager window appears.
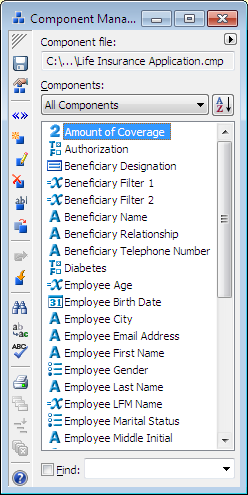
- Click the Components drop-down button and select Dialogs. The list shows the Beneficiary Designation dialog that you already created in the previous lesson.
- Click the
 New Component button. The Dialog Editor appears.
You can assign a dialog title to a dialog by typing it in the Title box. The title replaces the dialog name when the dialog is presented during the interview.
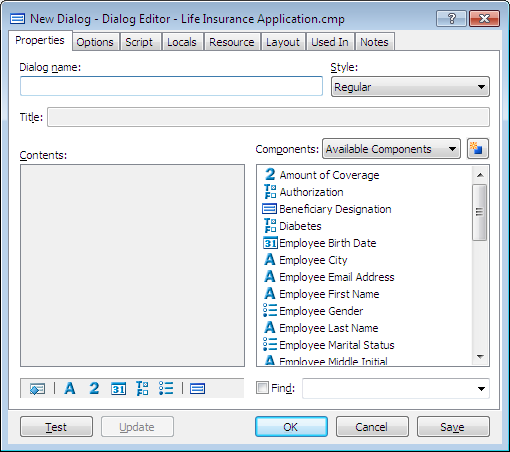
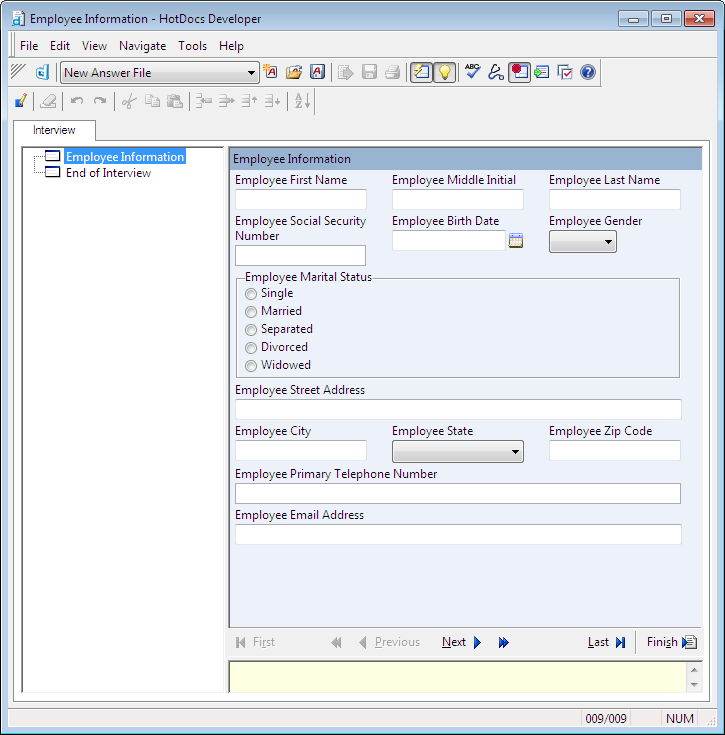
- Type Employee Information in the Dialog name box.
- Drag the following variables into the Contents box, in this order:
Employee First Name
Employee Middle Initial
Employee Last Name
Employee Social Security Number
Employee Birth Date
Employee Gender
Employee Marital Status
Employee Street Address
Employee City
Employee State
Employee Zip Code
Employee Primary Telephone Number
Employee Email Address
- Click Test. A test assembly window appears.
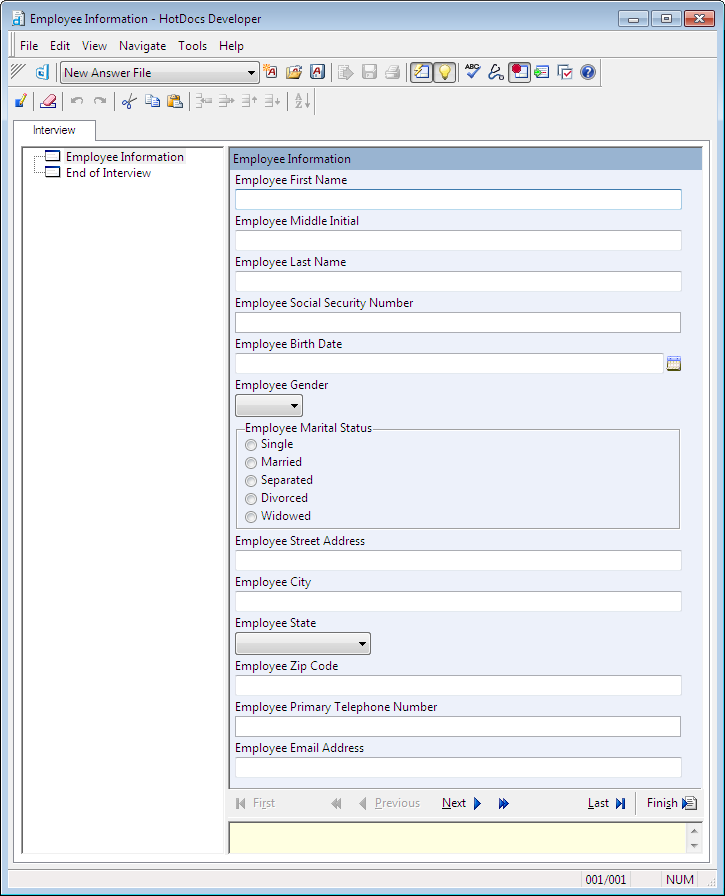
The dialog looks exactly the way it will during the interview. To make it look nicer, you can place up to three variables side by side on each line.
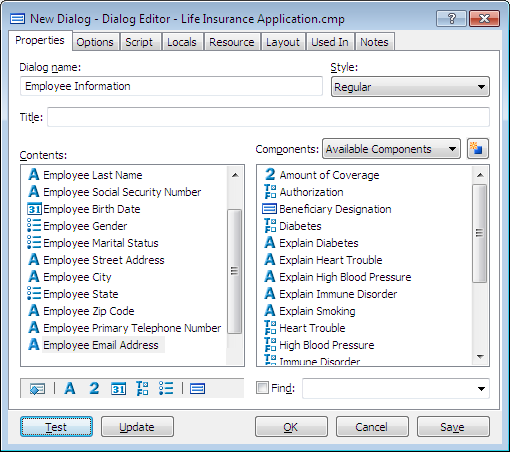
- Select Employee Information in the interview outline, and click the
 Edit Component button. The Dialog Editor is brought to the front.
Please see Lesson 14: Change the Placement of Variables in the Dialog (page 121) if you need help arranging variables side by side in the dialog.
- At the Layout tab, drag and arrange the following groups of variables to appear on the same line:
- Employee First Name, Employee Middle Initial, Employee Last Name
- Employee Social Security Number, Employee Birth Date, Employee Gender
- Employee Marital Status
- Employee Street Address
- Employee City, Employee State, Employee Zip Code
- Employee Personal Telephone Number
- Employee Email Address
- Click OK to close the Dialog Editor. The test assembly window shows the updated dialog layout.
- Choose Close (File menu) to close the assembly window. The Employee Information dialog is now complete.
On Your Own
The next dialog you will create is for the Coverage Information section. Create a dialog named Coverage Information, which contains the following two variables:
Amount of Coverage
Monthly Contribution to Cash Account
Please refer to the previous section if you need help creating this dialog.
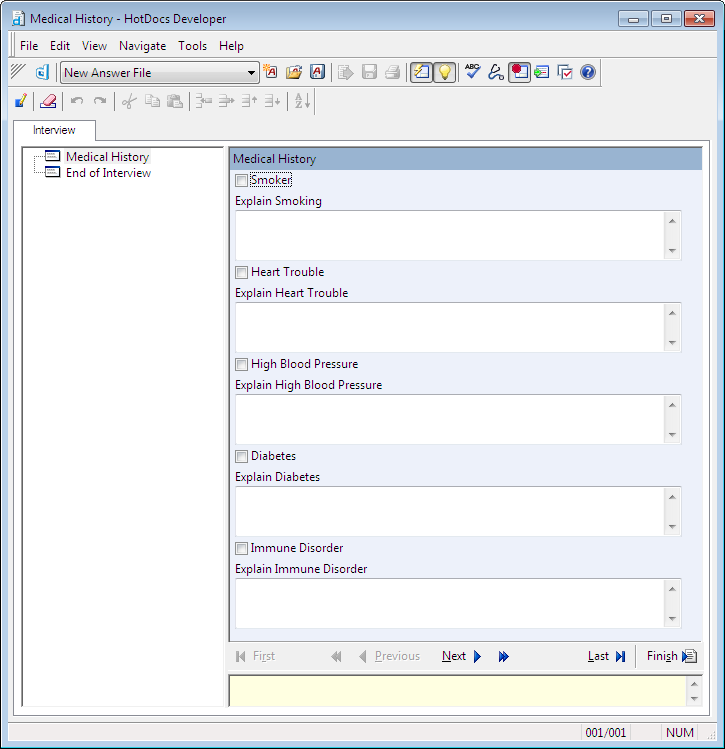
Create the Medical History Dialog
The dialog for the Medical History section will contain five True/False variables, along with five corresponding Text variables to explain any health conditions.
To create the Medical History dialog
- In Component Manager, click the
 New Component button. The Dialog Editor appears.
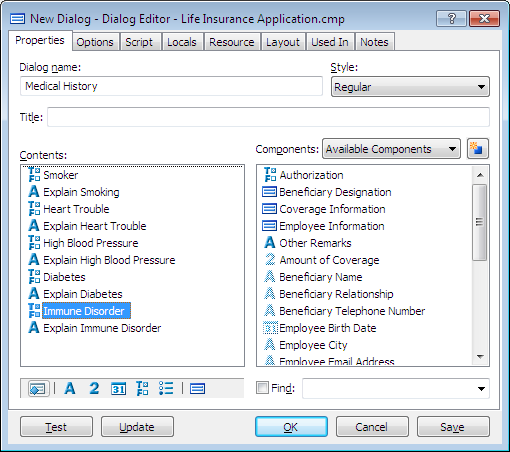
 - Enter Medical History in the Dialog name box.
- Drag the following variables from the Components list to the Contents list, in this order:
Smoker
Explain Smoking
Heart Trouble
Explain Heart Trouble
High Blood Pressure
Explain High Blood Pressure
Diabetes
Explain Diabetes
Immune Disorder
Explain Immune Disorder
If you were to test the dialog at this point, you would see all of your variables in the order in which you added them to the Contents list, and each True/False variable would contain yes/no options. To simplify the dialog, you can change these True/False variables to use check boxes instead. Not only do check boxes make the dialog appear more compact, they also help reduce the number of mouse clicks required to answer the dialog.
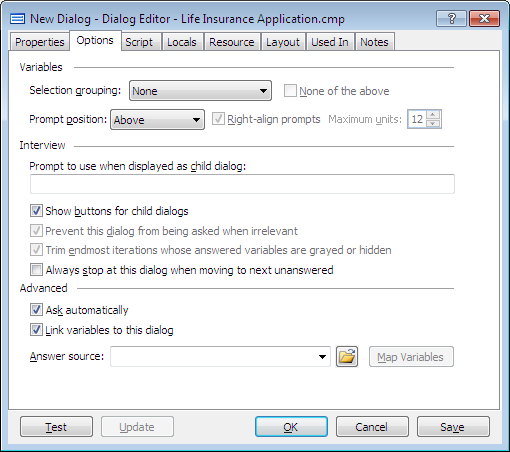
- Click the Options tab of the Dialog Editor. The window changes to show several custom options.
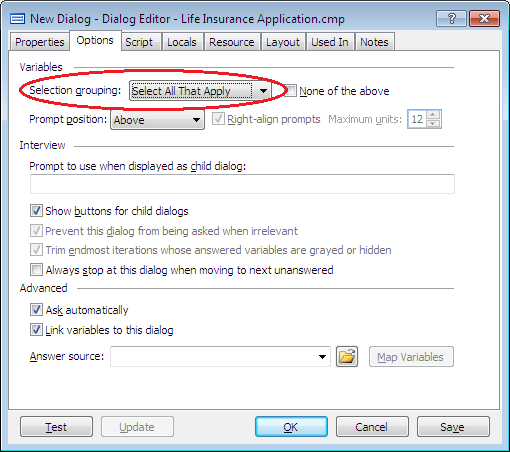
The Select All That Apply grouping causes True/False variables in the dialog to appear as check boxes. This is more efficient than showing yes/no options for each question.
- Click the Selection grouping drop-down button and choose Select All That Apply.
- Click Test. The test assembly window appears, showing your dialog. A check box appears for each True/False variable, allowing you to check the health conditions that apply.
Create Custom Prompts for Variables
As you can see in the assembly window, the prompt displayed for each variable is the name of the variable by default. Sometimes, you may want the prompt, or question that appears in the interview, to be different than the variable’s name. Other times, you may not want a prompt at all.
In the Medical History dialog, you will change the prompts for the True/False variables to assist the user in answering the questions appropriately.
To change the prompts for the Medical History check boxes
- Go back to the Properties tab.
- Right-click on the Smoker check box, and select Edit Component from the shortcut menu. The True/False Variable Editor appears.
- In the Prompt box, enter the following text:
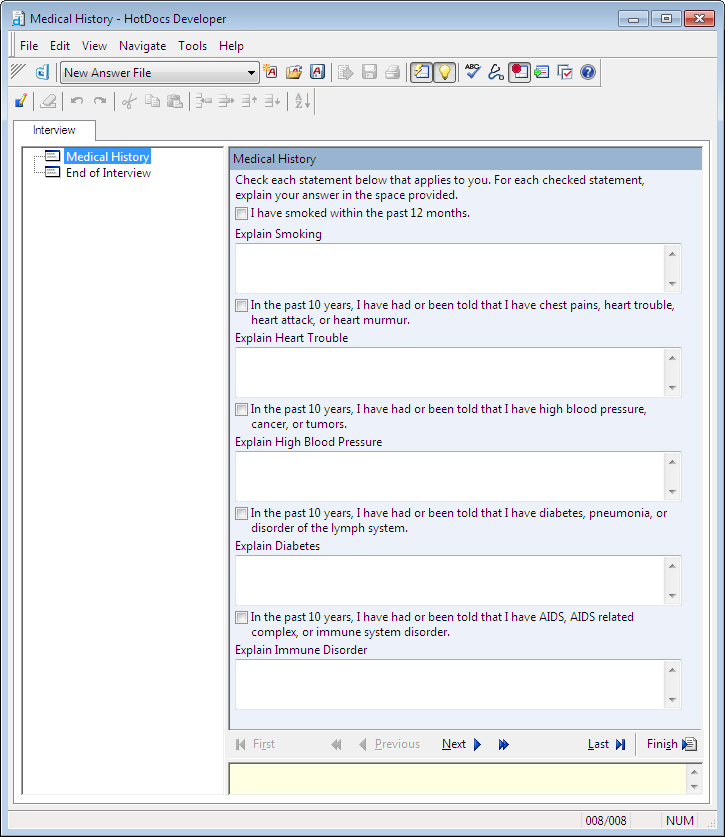
I have smoked within the past 12 months.
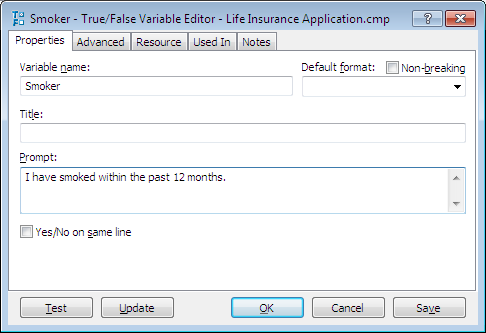
- Click OK to close the True/False Variable Editor. The dialog is updated to show the new prompt.
- Repeat steps 1–3 to create prompts for the remaining True/False variables in the dialog, using the following text:
- In the past 10 years, I have had or been told that I have chest pains, heart trouble, heart attack, or heart murmur.
- In the past 10 years, I have had or been told that I have high blood pressure, cancer, or tumors.
- In the past 10 years, I have had or been told that I have diabetes, pneumonia, or a disorder of the lymph system.
- In the past 10 years, I have had or been told that I have AIDS, AIDS-related complex, or an immune system disorder.
Just as you can add prompts to variables, you can add text to the dialog to guide users in answering the questions. In this dialog, you will add text to instruct users what to enter in the text boxes.
To add explanatory text to the dialog
- At the assembly window, select the Medical History dialog in the interview outline and click the
 Edit Component button. The Dialog Editor is brought to the front.
 - At the Properties tab, click the
 Create New Dialog Element button and drag it to the top of the Contents box, above the Smoker variable.
- Release the mouse button. The Dialog Element Editor appears.
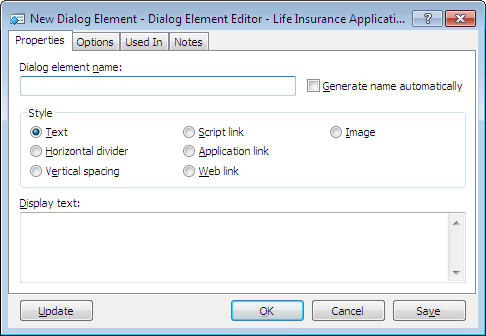
- Enter Medical History Explanation in the Dialog element name box.

- In the Display text box, type the following:
Check each statement below that applies to you. For each checked statement, explain your answer in the space provided.
- Click OK. The dialog element is created and added to the dialog.

- Click Update. The dialog element appears at the top of the dialog, providing the user with information about how to answer the questions.
The final change you will make to the prompts in this dialog is to hide the prompts for each of the explanation fields. Since the dialog element you added to the top of the dialog already explains how to answer the questions, the default prompts for these text fields are unnecessary.
To hide the prompts for the text fields
- Click in the Explain Smoking field, and then click the
 Edit Component button (or press Ctrl+E). The Text Variable Editor appears.
 - In the Prompt box, type NONE. (This is a special keyword that tells HotDocs not to display a prompt for the variable.)
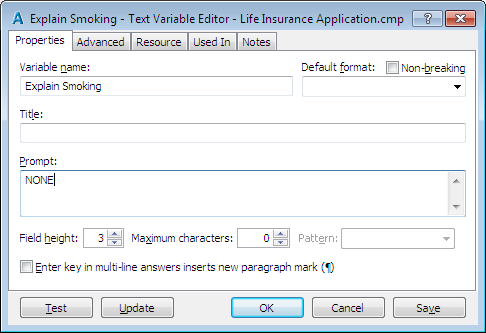
- Click OK to close the Text Variable Editor. The test assembly window is updated to show the variable without a prompt.
- Repeat steps 1–3 to remove the prompts for the remaining explanation fields.
Make Variables in a Dialog Conditional
In Lesson 7, you made the text fields in the Medical History section of the template conditional upon their corresponding yes/no questions—if a user circles yes, he or she can tab to the text field and enter an explanation for the health condition. You can also use conditional logic to make answer fields in a dialog conditional upon other questions being answered.
In this lesson, you will create a dialog script that grays the answer fields for the health explanations if the user doesn’t select the preceding check boxes.
To create a dialog script
- At the assembly window, select the Medical History dialog in the interview outline and click the
 Edit Component button. The Dialog Editor is brought to the front.
 - Click the Script tab. The window changes to show a scripting box.
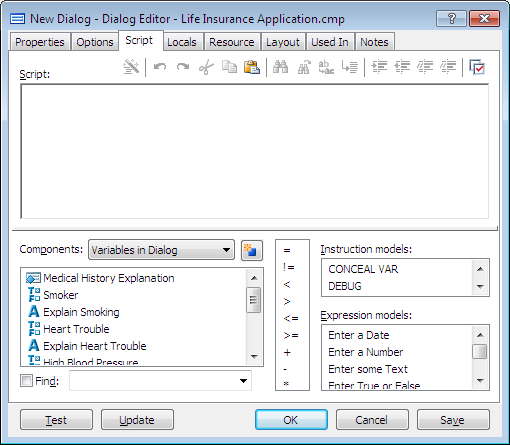
Notice that the Components list contains a list of all of the components used in this particular dialog. They are listed in the same order as they were added to the dialog.
You can quickly access the list of components by pressing the F5 key or Ctrl+Spacebar.
3. Click in the Script box, and enter the following script:
GRAY Explain Smoking
GRAY Explain Heart Trouble
GRAY Explain High Blood Pressure
GRAY Explain Diabetes
GRAY Explain Immune Disorder
These instructions gray the explanation fields so the user can’t enter any answers.
- After the last GRAY instruction, press Enter and enter the following script:
IF Smoker
UNGRAY Explain Smoking
END IF
This tells HotDocs that if the user selects the Smoker True/False variable, it should ungray the corresponding Text variable so the user can answer it.
On Your Own
Drag the bottom border of the Script box to make the script-writing area bigger. This allows you to see more of your script.
Using the condition for Smoker as an example, ungray the four remaining Text variables (Explain Heart Trouble, Explain High Blood Pressure, Explain Diabetes, and Explain Immune Disorder) based on their corresponding True/False variables being TRUE.
When you are finished, the dialog script should look like this:
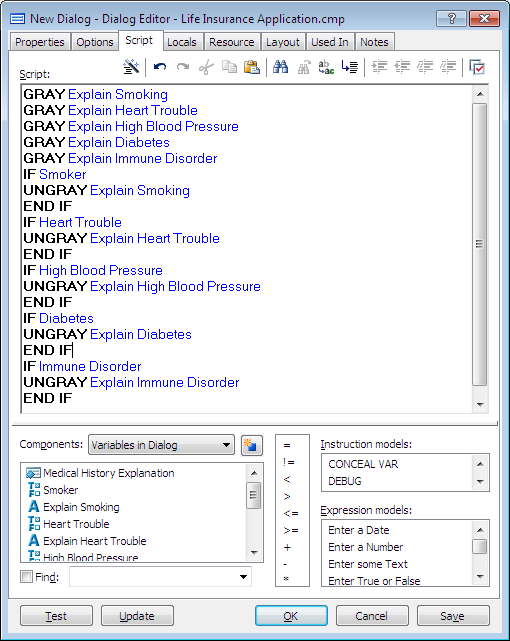
To format the script so that any instructions or variables within an IF instruction are indented, click the ![]() Auto Format button.
Auto Format button.
You can now test the dialog to see how the script works. Click Update to preview the dialog in the test assembly window. The explanation fields are grayed until you select the corresponding check boxes. When you are finished testing, choose Close (File menu) to close the test assembly window, and then click OK at the Dialog Editor.
Create Default Dialogs
Your component file now contains four dialogs—three dialogs you have created in this lesson and the Beneficiary Designation dialog you created in the previous lesson. Because the last two sections of the form contain only one variable each, you have several options for creating the dialogs:
- You could create a separate dialog for each section, as you have done previously. Each dialog would contain only one variable.
- You could create a dialog for both sections combined, and include both variables in the same dialog.
- You could use default dialogs, where HotDocs displays each variable in the interview individually as if it were a dialog.
For this template, you will use the third option, which saves you the time of creating dialogs that contain only one variable each.
When HotDocs displays a default dialog for a variable, it uses the variable’s prompt as the title in the interview outline. To make the default dialog more consistent with the other dialogs you created, you can specify your own title instead.
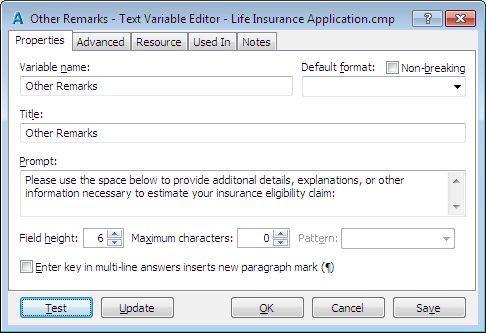
To specify a title and prompt for the Other Remarks default dialog
- In Component Manager, select All Variables from the Components drop-down list. The list changes to show all variables in the component file.
- Double-click the Other Remarks variable. (You may have to scroll through the list to see the variable.) The Text Variable Editor appears.
- In the Title box, type Other Remarks.
- In the Prompt box, type the following text:
Please use the space below to provide additional details, explanations, or other information necessary to establish your insurance eligibility claim:
- Click Test. The test assembly window appears, showing the default dialog for your variable.
- Choose Close (File menu) to close the test assembly window, and then click OK to close the Text Variable Editor.
On Your Own
The Authorization variable also needs a custom title and prompt for its default dialog. Use Authorization and Signature as its title and the following text as its prompt:
I hereby authorize Hobble Creek Publishing, the employer, to deduct from my wages amounts equal to the contributions required of me for Group Insurance under the policy issued to the employer by Hobble Creek Life Insurance Company.
Please refer to the previous section if you need help setting the title and prompt for this variable. When you are finished, close Component Manager.
Attach an Answer Wizard to a Computed Field
When a user direct-fills a form document, he or she answers questions by clicking on a field and entering the answer in the field. Sometimes, however, the user may not be able to enter an answer in the field, either because the field requires other variables be answered to calculate its answer, or because it’s conditioned on another field’s answer in the document. To help users answer the questions necessary to fill in the field, you can assign an answer wizard to the field. An answer wizard attaches an ![]() Answer Wizard button to the field that, when clicked, displays a pop-up interview asking the required questions.
Answer Wizard button to the field that, when clicked, displays a pop-up interview asking the required questions.
Because the Name field contains a computed value, you will attach an answer wizard so users can enter answers for the employee’s first, middle, and last names. The computation attached to that field will then combine the names and merge them into the field. Without an answer wizard, clicking that field during assembly would reveal a grayed, or disabled, field that would not allow users to enter an answer.
To attach an answer wizard to the Name field
- Select the Employee LFM Name field.
To access the Field Properties dialog box, you can also select a field and press Alt+Enter.
- Click the
 Field Properties button. The Field Properties dialog box appears.
 - At the Type tab, click the
 Wizard button. The Answer Wizard Field dialog box appears.

- Select ASK Dialog.
- Click the Dialog drop-down button and select Employee Information.
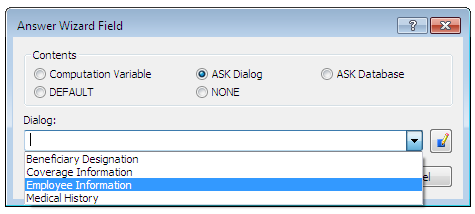
- Click OK at the Answer Wizard Field dialog box. An ASK instruction is inserted in the Wizard box.
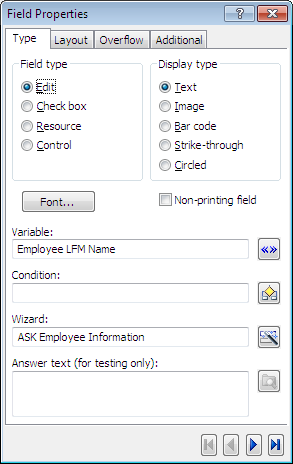
- Close the Field Properties dialog box.
Assign DEFAULT Answer Wizards to Fields
In the previous section, you attached an answer wizard to the Name field. There are a number of other fields in your template where answer wizards are recommended. For example, conditioned fields like those in the Medical History section typically use answer wizards to aid users in answering all of the required conditions for the field. The Beneficiary Designation tables could also use an answer wizard, which would allow the user to enter as many beneficiaries as needed, even if they do not all fit in the allotted space on the form. (Additional answers would be sent to an addendum.)
Instead of using a specific dialog as the answer wizard for these fields as you did with the Name field, you can use the DEFAULT answer wizard. HotDocs will then automatically ask any dialogs necessary for those fields.
To assign the DEFAULT answer wizard to multiple fields
- On the first page of your template, make sure no existing fields are selected by clicking on any white space.
- Press and hold the Shift key while clicking each of the following fields:
Employee Age
Explain Smoking
Explain Heart Trouble
Explain High Blood Pressure
Explain Diabetes
Explain Immune Disorder
A selection box appears around each of the six selected fields.
- Click the
 Field Properties button. The Field Properties [Multiple] dialog box appears.
 - Click the
 Answer Wizard button next to the Wizard field. The Answer Wizard Field dialog box appears.
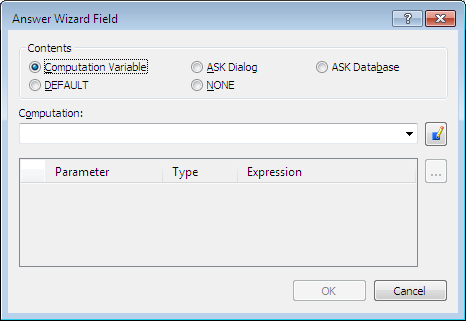
- Select DEFAULT from the Contents group, and then click OK. The default answer wizard is inserted in the Wizard box.
To assign a DEFAULT answer wizard to the beneficiary tables
- Select the Beneficiary Designation table at the bottom of the first page.
- In the Field Properties dialog box, click the
 Answer Wizard button next to the Wizard field. The Answer Wizard Field dialog box appears.

- Select DEFAULT from the Contents group, and then click OK. The default answer wizard is inserted in the Wizard box.
- Repeat steps 1–3 for the Beneficiary Designation table at the top of the second page.
- Close the Field Properties dialog box.
Assemble a Form Document Using Direct-Fill
Your form template is now nearly complete. You can check your progress by test assembling it using direct-fill assembly, where you enter answers directly in the form fields instead of a separate interview. (You will learn how to create an interview in the next lesson.)
Even if you decide to provide an interview for your template, users still have the option of using direct-fill assembly, so you should test your templates using direct-fill to ensure that they work as expected.
As you develop your own form templates, you may decide that direct-fill assembly meets your needs for some templates, while other more complex templates may require an interview to help guide the person filling out the form.
To test assemble a document using direct-fill
- Click the
 Test Assemble button. A test assembly window appears, displaying the Form Document tab.
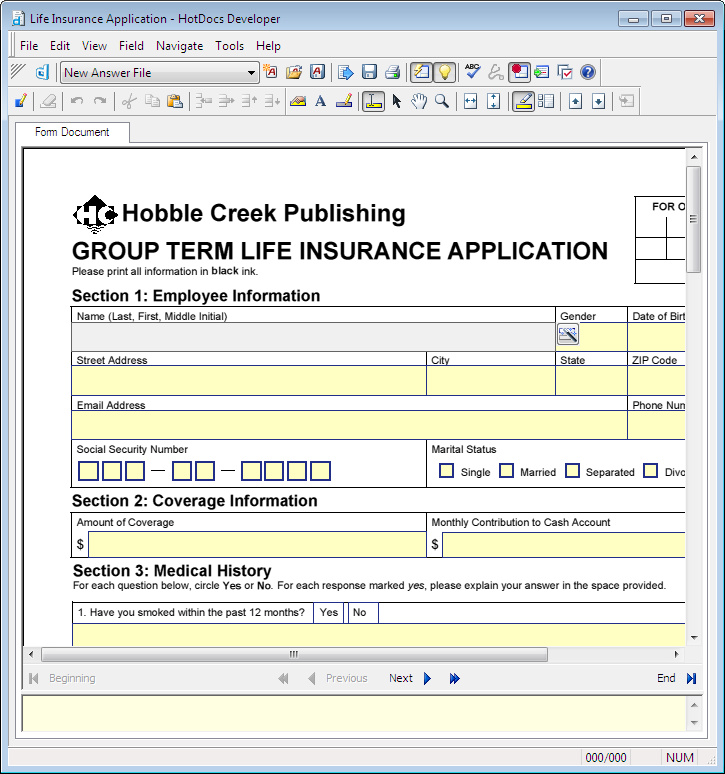
- In each field, enter an answer. To move to the next field, press the Tab key (or click the desired field with the mouse).
If a field is grayed (disabled), its answer is either the result of a computation, or it is conditioned upon the answer for another variable. To enter answers in these fields, click the
 Answer Wizard button (or press F5) and answer questions in the pop-up dialogs.
 - When you are finished, choose Close (File menu) to close the test assembly window.
Conclusion
You are now finished with this lesson. In it, you learned how to group variables to create custom dialogs, and how to customize the titles and prompts displayed in those dialogs. You also learned how to customize the appearance of default dialogs—dialogs created during assembly for variables that are not included in a custom dialog. Finally, you learned how to create answer wizards for fields and test assemble the template using direct-fill assembly.
Click the ![]() Save Form button to save the template. If you do not want to go on to Lesson 10 at this time, choose Exit (File menu). Then exit HotDocs.
Save Form button to save the template. If you do not want to go on to Lesson 10 at this time, choose Exit (File menu). Then exit HotDocs.