Lesson 5: Select Related Database Records
Overview
Sometimes your template may link to more than one database table. If so, and if both tables have at least one field in common, you can create a filter based on this association so that, during assembly, you can select a record from one table and have the corresponding records from the other table automatically selected.
For example, both the INVOICE and CLIENT tables used in the Collection Letter template have a field named CLIENTID. Using this commonality, you can set up a filter so that when the user selects an unpaid invoice from the INVOICE table, HotDocs automatically retrieves, from the CLIENT table, the client whose name is on the unpaid account.
Start the Tutorial
If you are continuing immediately from Lesson 4, skip the instructions for opening the template and proceed to “Link the Common Field to a Variable.”
If you closed the template at the end of Lesson 4, complete the following steps.
To open the Collection Letter template
- Open your word processor and click the
 HotDocs button. The My
Test Templates library appears.
HotDocs button. The My
Test Templates library appears.
If the My Test Templates library does not appear, choose Open Library (File menu), select the library in the default Libraries folder (for example, My Test Templates.hdl), and click Open.
- Select Collection Letter and
click
 Edit.
The template appears, ready for you to edit.
Edit.
The template appears, ready for you to edit. - Click the
 Component
Manager button. The Component
Manager window appears.
Component
Manager button. The Component
Manager window appears.
Link the Common Field to a Variable
In order to associate the CLIENT and INVOICE tables, you must first link the common field, CLIENTID, to a variable in the component file. However, since this variable does not yet exist, you must create it. Once created, you can filter records based on the answer to this variable.
To create a variable and link your common field to it
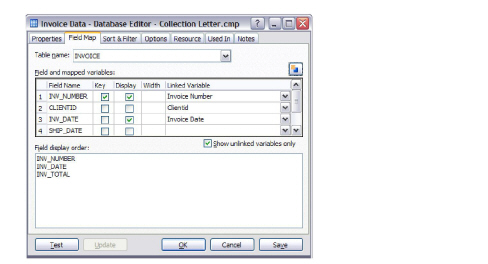
- From Component Manager, edit the Invoice Data database component. The Database Editor appears.
- Click the Field Map tab. The window changes to show which variables in the template are linked to which fields in the table.
- In the Linked Variable column, click the empty cell next to the CLIENTID field and click the
 New Component button. The Number Variable Editor appears.
Because CLIENTID is a number field, HotDocs automatically creates a Number variable and assigns a name to it, based on the name of the table field.
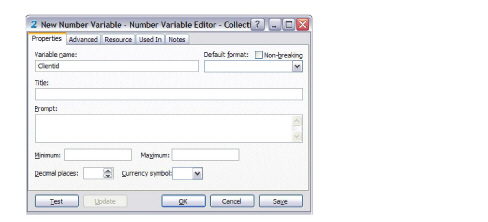
- Click OK. HotDocs creates the variable (Clientid) and links it to the field in the table.
- Click OK to close the Database Editor.
Use the Linked Variable as a Filter
The next step in this process is to use the HotDocs variable you just linked to the INVOICE table to filter the same company record from the CLIENT table. The filter uses the answer for CLIENTID (which is answered when the user selects an invoice) and returns the record from the CLIENT table that matches that value.
To create a filter
- Using Component Manager, edit the Client Data database component. The Database Editor appears.
- Click the Sort & Filter tab. HotDocs displays options for sorting and filtering the records in the database.
- Click the Filter by Field drop-down button and select CLIENTID.
- Click the Comparison drop-down button and select EQUAL.
- Click the Compared to drop-down button and select Clientid.
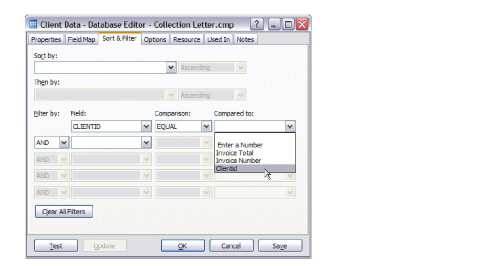
- Click OK to save your work and close the Database Editor.
- Close Component Manager.
In the next lesson, you will test the template and see how, when a record is selected from the INVOICE table during assembly, HotDocs automatically selects the record in the CLIENT table that corresponds with the chosen invoice.
Conclusion
You are now finished with this lesson. In it, you learned how to link common fields between the two database components. You then learned to create a filter that will retrieve related records from both database tables.
If you do not want to go on to Lesson 6 at this time, click the ![]() Save and Close button to close the template. Then exit HotDocs.
Save and Close button to close the template. Then exit HotDocs.
If you are continuing on to Lesson 6, click the ![]() Save button to save your work.
Save button to save your work.