At a Glance: The Assembly Window
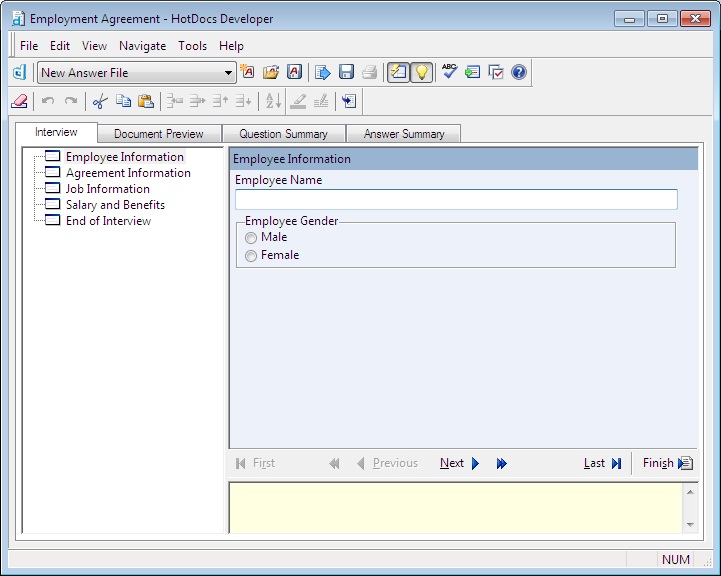
Menu Bar
Tool Bar
Tabs
Interview Outline
Interview Pane
Resource Pane
Navigation Bar
When you choose to assemble a template HotDocs will open an Interview window. Using this window you can enter answers, view resources, view summaries, and preview the finished document.
The main portion of the Interview window is split into 3 panes. The Interview Outline, the Interview Pane, and the Resource Pane.
The Interview Outline shows a list of dialogs within the interview. Next to each dialog is an icon indicating the dialogs status and type:
 None of the questions in the dialog are answered.
 At least one of the questions in the dialog is answered.
 All of the questions in the dialog are answered.
 Repeats the dialog, allowing you to enter more than one set of answers.
 Allows you to enter a new set of answers in a list.
In the Interview Pane you can see questions on the selected dialog and spaces to type or select your answers. These can be in the form of text or number fields, check boxes, spreadsheets or drop down menus.
Some dialogs or questions will have extra resource information to help the user answer the question (see Add Resource Information to a Variable or Dialog). This information can be displayed in the Resource Pane.
Between the Resource Pane and the Interview Pane you can see the Navigation Bar. This contains the following buttons to help you move though the interview:
 First Dialog
 Previous Unanswered Dialog
 Previous Dialog
 Next Dialog
 Next Unanswered Dialog
 Last Dialog
 Finish Interview
Interview is just one of the five available pages you can look at from this window. You can move to the other pages by clicking on one of the Tabs below the Toolbar:
- Document Preview: A preview of the finished document showing the answers in place.
- Question Summary: Displays a list of questions that are asked in the interview with space for answers. This can be printed and used as a paper questionnaire version of the interview.
- Answer Summary: Displays a summary of questions in an interview as well as any answers you entered.
- Variable Sheet: Displays a spreadsheet of variables, prompts, current answers, and variable types. You can sort the spreadsheet by clicking the spreadsheet column headings.
You can click on the Interview tab to return to the interview you are working on.
Above all of the tabs are the Menu bar and Toolbar. From the Toolbar you can access the following buttons:
 HotDocs Library: Displays the HotDocs library window.
- Recent Answer Files Drop-down List: Displays a list of recently used answer files. Click this button to select a different answer file.
 New Answer File: Replaces the current answer file with a new, empty answer file.
 Open Answer File: Opens the Open Answer File dialog box so you can select another answer file for the interview.
 Save Answer File: Saves changes to the answer file.
 Send Document to: Sends a copy of the assembled document to a word processor or HotDocs Filler, depending on the type of template you are using. Once in the word processor or HotDocs Filler, you can make post-assembly changes to the document. Be aware, however, that any changes you make will only affect that document -- your changes will not be saved in the answer file.
 Save Document: Saves the document to disk. The Save As dialog box will appear, allowing you to specify a name and location for the saved file.
 Print Document: Prints a copy of the current document.
 Instant Update: Determines when HotDocs updates the interview. If the button is pressed down, this happens when you move between answer fields. If it is not pressed down, this happens when you navigate to another dialog. This can help speed up how quickly you are able to move through answer fields in the dialog.
 Show Resource Pane: Shows and hides the resource pane where helpful information about a question or group of questions can be viewed.
 Check Spelling: Checks the spelling of text answers entered during the interview.
 Show Assembly Queue: Displays the assembly queue, which lists all of the templates you have chosen for assembly. The queue gives you greater control over the assembly process when you are assembling multiple documents.
 HotDocs Options: Opens the HotDocs Options dialog box where you can specify several preferences that control how HotDocs works.
 Help: Opens the relevant page of the HotDocs Help File.
 Erase Answer: Clears the answer from the answer field.
 Undo: Undoes the most recent change made to an answer.
 Redo: Restores changes that were made to an answer.
 Cut: Cuts the selected text and saves it to the Windows Clipboard. You can then paste the text into another answer field.
 Copy: Copies the selected text and saves it to the Windows Clipboard. You can then paste it elsewhere.
 Paste: Pastes any text that has been saved to the Windows Clipboard into the current answer field.
 Insert Repetition in a Spreadsheet: Inserts a new, empty repetition above the current repetition.
 Delete Repetition in a Spreadsheet: Deletes the selected repetition from the interview. Any answers you have entered will be lost.
 Move Repetition Up in a Spreadsheet: Moves the selected repetition up in the list of answers. You should be aware, however, that if the template provider has assigned sorting options to the list, answers in the assembled document will be listed in that order instead of the order you specify here.
 Move Repetition Down in a Spreadsheet: Moves the selected repetition down in the list of answers. You should be aware, however, that if the template provider has assigned sorting options to the list, answers in the assembled document will be listed in that order instead of the order you specify here.
 Sort Spreadsheet: Sorts columns in a spreadsheet in either ascending or descending order. To sort on a second level, include those search options on the second line of the Sort Spreadsheet dialog.
 Highlight Fields: Highlights all answers or unanswered variables at the document preview tab.
 Edit Document Text: Opens the Document Text Editor where you can edit modifiable text within the document.
 Go to Answer in Document (at Interview tab): Positioning your cursor within an answer field and clicking this button will take you to the answer at the Document Preview tab, letting you view the answer in place.
 Go to Answer in Interview (at Document Preview tab): Positioning your cursor at an answer on the Document Preview tab and clicking this button will take you to the corresponding answer field in the Interview tab.
When assembling a form document additional tool bar options become available:
 Field Properties: Changes the properties for the selected field or fields.
 Font: Changes the font for the selected field or fields.
 Override Answer: Allows you to type any answer in the field, even if the field requires a certain type. For example, you can override a number-only field and type a text answer.
 Fill Tool: Allows you to enter information in the field, such as an answer.
 Select Tool: Activates the Select Tool. This button allows you to select an existing field so that you can move it, resize it, or edit its properties (including the variable properties).
 Scroll Tool: Makes the Scroll Tool the current cursor. Use the cursor to grab the current form page and drag it around the window.
 Zoom Tool: Activates the Zoom Tool, allowing you to increase or decrease magnification of the template.
 View Page Width: Displays the entire width of the current form page in the window.
 View Full Page: Shows the whole form document in the window.
 Show Fields: Shows and hides the colored field backgrounds during direct-fill assembly of a form document.
 Show Thumbnails: Shows and hides thumbnail images of each page in the form. You can use these pages to move through the document.
 Previous Page: Moves to the page just before the current page in the form.
 Next Page: Moves to the page just after the current page in the form.
In the Menu Bar you can access further options not available on the Toolbar.
To learn more about assembling templates follow the links below:
- Introduction: Assemble a Text or Form Document
- Adjust HotDocs Windows and Panes
- Update Your Interview Outline and Document
- Preview a Template Before Assembling It
- Assemble a Text or Form Document
- Assemble an Interview Template
- Assemble a Document Without Showing an Interview
- Assemble Multiple Documents
- Assemble a Clause Library from the Template Library
- Navigate Through Answer-Gathering Dialogs
- View Resources During Assembly
- Use Repeated Dialogs During Assembly
- Use Inserted Dialogs During Assembly
- Select Clauses During an Interview
- Use the End of Interview Dialog
- Spell Check Answers