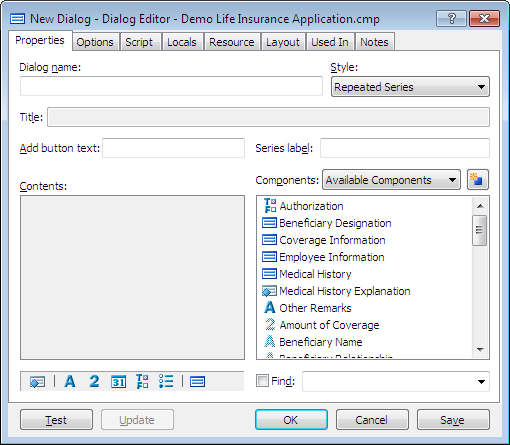
At a Glance: The Dialog Editor (Properties Tab)

A
B
C
D
E
F
G
H
K
You can open the Dialog Editor from the Component Manager or while editing a template by creating a new dialog or opening an existing dialog.
In the first text field A you can enter the dialog name. In the drop-down list B to the right of the Dialog Name field you can choose the style of your dialog from the following list:
- Regular
- Repeated Series
- Spreadsheet
- Spreadsheet on Parent
The option you choose here changes the next couple of options. If you select Regular you will only see the Title field C where you can enter a title for your dialog. If you select Repeated Series you will see the Title field C, then below it you will have the options to add button text D and label the series E (see image above). If you select Spreadsheet or Spreadsheet on Parent you will see the Title field C and the Add Button Text field D, but instead of the Series Label field E you will have the option to select how many rows of the spreadsheet you would like HotDocs to display and if you would like to hide the spreadsheet buttons.
This feature will alter the amount of spreadsheet rows displayed in the interview, it will not stop the user from entering information in further rows. If they do this, the user can view the extra rows by using the scroll bars on the spreadsheet. To reduce the amount of rows that the user can enter information into see LIMIT NUM.
The Rows to display feature is not compatible with templates published for HotDocs Server. Any alteration you make to this field will not be visible in the Server interview.
Regardless of what option you have selected the rest of the window will remain the same. On the left is the Contents field F where you can see what components are in our dialog. On the right is the Available Components field G where you can see all the components in the Component File for this template. You can drag components from this field into the Contents field to have them in this dialog; any component with a faded symbol is already assigned to another dialog. At the top of the Available Component field is a drop down list that you can use to filter the displayed components and a button you can click to create a new component .
.
At the bottom left of the window you have a small toolbar H where you can generate new components, dialogs and dialog elements by clicking on the component type icon:
 Dialog Element
 Text Variable
 Number Variable
 Date Variable
 True/False Variable
 Multiple Choice Variable
 Dialog
You can also use the Find field K on the bottom right to search the Available Components field.
More dialog options are available in the other tabs: Options, Script, Layout, Used In and Notes.
To learn more about using the Dialog Editor follow the links below:
- Introduction: Create Your Own Dialogs
- Gather Questions into a Custom Dialog
- Edit a Custom Dialog
- At a Glance: The Dialog Editor (Options tab)
- At a Glance: The Dialog Editor (Script tab)
- At a Glance: The Locals tab (Variable/Dialog Editor)
- At a Glance: The Resource tab (Variable/Dialog Editor)
- At a Glance: The Dialog Editor (Layout tab)
- At a Glance: The Used In tab (Variable/Dialog Editor)
- At a Glance: The Notes tab (Variable/Dialog Editor)
- Tips on Naming Your Variables