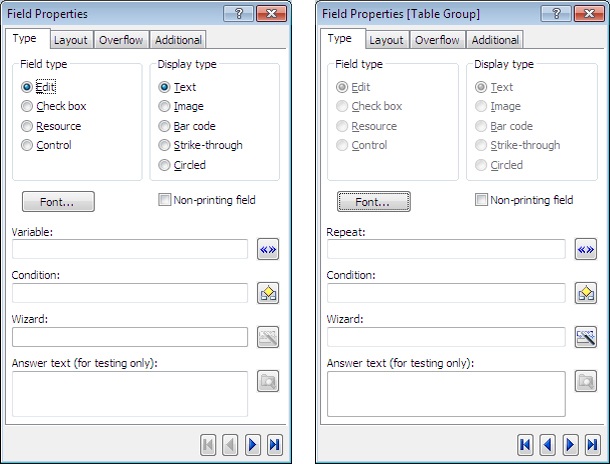
At a Glance: The Field Properties dialog box (Type Tab)
A
B
E
F
G
H
D
C
After opening HotDocs Automator, directly from the your start menu or by opening a form template to edit from a HotDocs Library, you can open the Field Properties dialog box by clicking the  Field Properties button.
At the top of the Type tab there are two multiple choice lists you can use to set the field type. You can use the first one A to select the field type from Edit, Check box, Resource or Control. Edit fields can have answers entered directly during assembly, Check box fields allow the user to click to select one or more options in a list, Resource fields are uneditable during assembly and are used to give the user access to further information, and Control fields are non-printing fields that can be used to control the assembly of the form (See Create a Field for Behind-the-Scenes Tasks).
You can the use the second list B to set the display type for that field (these options change depending upon your choice in the Field type list A). If the Field type is Edit or Control the you will have the choice of Text, Image, Bar Code, Strike-through, or Circled. If you select Check Box you can choose from Character, Strike-through, or Circled. Finally, if you select Resource you can choose from Hyperlink, Image, or Bar Code. See below for explanations of each Display type option.
- Text: Create a field that will display a text answer.
- Image: The field will display an image; this image can be decided by a multiple choice question during assembly. See Insert a Graphic File in a Form.
- Bar Code: HotDocs will display the answer in the form of a bar code, for more information on setting the bar code options see At a Glance: The Field Properties Dialog Box (Barcode Tab) and Convert Answers on the Form to Bar Code Format.
- Strike-through: This field will allow the user to strike out the incorrect option from the underlying static text. See Cross Out Static Text on the Form.
- Circled: This field will allow the user to circle the correct option from the underlying static text. See Circle Static Text on a Form.
- Character: This allows you to use a character (like an X or a ü) to mark a check box. See Create a Check-Box Field.
- Hyperlink: This type of field adds an uneditable hyperlink to the form, it can be used to direct users to further information they may need to correctly fill out the form. See Create a Resource Link on a Form.
Below the Field type list is the Font... button C, clicking this will open the Font dialog where you can choose the font type and size for this field. To the right of the Font button is a check box D that you can tick if you would like this to be a non-printing field.
Underneath these options is a series of four text fields where you can choose to add features to the field. Click the  Variable button E to create a variable for this field, the
  IF Field button F to make the field conditional, and the
  Answer Wizard button G to create an answer wizard for this field.
The fourth field H will be slightly different depending on which option you selected from the Display type list B, but it is always used to designate the sample you would like to use for testing the field. For example that could be a sample image or piece of text.
If you are viewing the field properties for a table the Variable button will be replaced with the Repeat button where you will be able to attach a Repeat Dialog or Repeat Database (see image above).
More field properties options are available in the other tabs: Layout, Overflow, and Additional.
To learn more about setting field properties follow the links below:
- Preview the Formatting of Answers in a Form Field
- Show and Hide Fields
- Change the Field Type
- Change the Font Used for a Field
- Format Lines and Paragraphs of Text in a Form Field
- Rotate Answers in a Field
- Keep Contents of Form Fields from Printing
- Create a Field for Behind-the-Scenes Tasks
- Create a Resource Link on a Form
- Cross Out Static Text on the Form
- Circle Static Text on a Form
- Insert a Graphic File in a Form
- Convert Answers on the Form to Bar Code Format
- Attach an Answer Wizard to a Field